Identify your endoscope type and the right iPhone app path
Most iPhone endoscope apps are not universal—what works is determined by how your endoscope connects (usually Wi-Fi SSID or a wired/adapter chain) and what workflow the device requires. Identify the device type below, then follow the matching path before you start downloading apps.
| If your endoscope… | Do this first on iPhone | App expectation |
|---|---|---|
| Broadcasts its own Wi-Fi network (SSID) | Join the SSID, then open the companion app and allow Local Network access | Usually the brand’s companion viewer app |
| Came with a QR code/app name | Use that app name and verify it in the App Store | Usually the exact referenced app |
| Mentions adapters/power | Confirm the adapter/power chain and the documented iPhone workflow | May work only with a specific workflow |
| Has “works on iPhone” but no steps | Treat as high risk; run the compatibility checklist before buying | Unknown until verified |
Two guardrails that prevent most frustration:
- USB-C on iPhone doesn’t automatically mean every USB endoscope works.
- For Wi-Fi devices, “no video” is often SSID + permission + app order, not a broken camera.
With that decision rule in mind, here’s how to pick the right app category.
Which endoscope camera apps work on iPhone (and why it depends on the device)
There isn’t one universal iPhone endoscope app—your endoscope’s connection method and required workflow decide which app category will work. Focus on verification, not app-name hype.
| Endoscope type | What “working” usually looks like on iPhone | How to verify fast |
|---|---|---|
| Wi-Fi endoscope / Wi-Fi borescope | iPhone joins the device SSID; app receives a local stream | Manual/label names an iOS app; reviews mention joining the SSID |
| QR-code endoscope | App name + pairing steps are required | App Store developer identity looks legitimate; no off-store install steps |
| Cable/USB endoscope | Correct adapter/power chain and a supported workflow | Listing shows iPhone steps (not just “Type-C”) |
Once you’ve confirmed the app matches the device workflow, prioritize:
- Stable preview + rotate/mirror controls
- Clear photo/video capture and export
- Minimal permissions and transparent pricing
Fast verification questions you can ask yourself (or the seller) before you commit:
- “Does it create its own Wi-Fi network, or is it meant to plug in by cable?”
- “Is there a named iOS app, with iOS screenshots and clear steps?”
- “If it’s wired, how is it powered and what adapters are required?”
Now let’s make the connection path predictable.
How to connect an endoscope to iPhone (Wi-Fi vs USB-C/Lightning)
Connection is usually the real blocker—use the Wi-Fi steps if your endoscope broadcasts an SSID, or the wired checklist if you’re using USB-C/Lightning plus adapters. The order matters.
| If your endoscope… | Do this first on iPhone | App expectation |
|---|---|---|
| Broadcasts its own Wi-Fi network (SSID) | Join the SSID, then open the companion app and allow Local Network access | Usually the brand’s companion viewer app |
| Came with a QR code/app name | Use that app name and verify it in the App Store | Usually the exact referenced app |
| Mentions adapters/power | Confirm the adapter/power chain and the documented iPhone workflow | May work only with a specific workflow |
| Has “works on iPhone” but no steps | Treat as high risk; run the compatibility checklist before buying | Unknown until verified |
Two guardrails that prevent most frustration:
- USB-C on iPhone doesn’t automatically mean every USB endoscope works.
- For Wi-Fi devices, “no video” is often SSID + permission + app order, not a broken camera.
With that decision rule in mind, here’s how to pick the right app category.
Which endoscope camera apps work on iPhone (and why it depends on the device)
There isn’t one universal iPhone endoscope app—your endoscope’s connection method and required workflow decide which app category will work. Focus on verification, not app-name hype.
| Endoscope type | What “working” usually looks like on iPhone | How to verify fast |
|---|---|---|
| Wi-Fi endoscope / Wi-Fi borescope | iPhone joins the device SSID; app receives a local stream | Manual/label names an iOS app; reviews mention joining the SSID |
| QR-code endoscope | App name + pairing steps are required | App Store developer identity looks legitimate; no off-store install steps |
| Cable/USB endoscope | Correct adapter/power chain and a supported workflow | Listing shows iPhone steps (not just “Type-C”) |
Once you’ve confirmed the app matches the device workflow, prioritize:
- Stable preview + rotate/mirror controls
- Clear photo/video capture and export
- Minimal permissions and transparent pricing
Fast verification questions you can ask yourself (or the seller) before you commit:
- “Does it create its own Wi-Fi network, or is it meant to plug in by cable?”
- “Is there a named iOS app, with iOS screenshots and clear steps?”
- “If it’s wired, how is it powered and what adapters are required?”
Now let’s make the connection path predictable.
How to connect an endoscope to iPhone (Wi-Fi vs USB-C/Lightning)
Connection is usually the real blocker—use the Wi-Fi steps if your endoscope broadcasts an SSID, or the wired checklist if you’re using USB-C/Lightning plus adapters. The order matters.

Wi-Fi endoscope setup (most common on iPhone)
Join the endoscope’s Wi-Fi SSID first, then open the app and allow local access—most “no video” issues come from skipping one of these.
- Power on the endoscope and wait for its Wi-Fi name (SSID) to appear.
- iPhone: Settings → Wi-Fi → select the endoscope SSID.
- Open the endoscope app after you’re connected to the SSID.
- If iOS asks about local network access, tap Allow. (Apple Support: Local Network access)
- If the app can’t find the camera, fully close and reopen the app, then confirm you’re still on the SSID.
- If the video drops after a few seconds, check whether iPhone switched back to your usual Wi-Fi/cellular internet; stay connected to the endoscope SSID while you’re using the camera.
Common gotchas (quick fixes):
- If iOS warns the Wi-Fi network has no internet, that can be normal for endoscopes—what matters is the local stream.
- If the app “can’t find device,” reboot the endoscope and rejoin the SSID before you reinstall apps.
If your device is wired, use a verification-first checklist instead of guessing.
Wired setup (USB-C/Lightning + adapter chain): what to check
For wired setups, success depends on the adapter/power chain and the device’s documented workflow—treat “works on iPhone” as something you verify.
- Identify your iPhone connector: USB-C or Lightning.
- Follow the seller/manual’s specified adapter chain; if none exists, assume higher risk.
- If the device needs extra power, use an adapter/hub that supports external power (conceptually similar to Apple’s USB device connection guidance). (Apple Support: camera adapters & USB devices)
- Connect everything first, then open the app and test.
- If you see “Accessory Not Supported” or no video source, move to the compatibility checklist before repeating app installs.
Before you troubleshoot deeply, confirm whether your endoscope is even likely to be compatible.
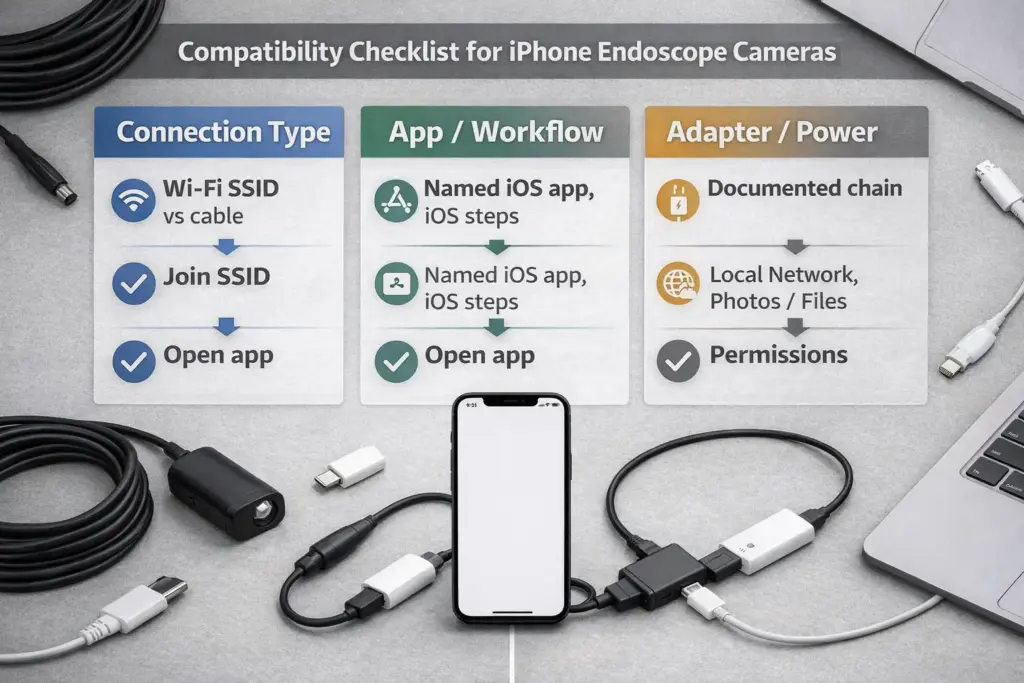
iPhone compatibility checklist (before you buy or download)
You can usually predict iPhone compatibility from a few signals—connection type, required app/workflow, connector/adapter chain, and power needs. This checklist helps you avoid wasted downloads and returns.
Quick compatibility checklist:
- Connection type is clear (Wi-Fi SSID vs cable/USB).
- iPhone steps are documented (iOS screenshots or explicit instructions).
- Required app name is provided (or the workflow is clearly described).
- Adapter/power needs are stated if it’s a wired device.
- Permission expectations make sense (Local Network for Wi-Fi; Photos/Files for saving).
Red flags that often signal a mismatch:
- “Works on iPhone” without any iPhone-specific steps or screenshots
- App download links that are not the App Store
- Reviews that repeatedly mention “black screen” with no clear resolution
- Wired devices that mention adapters but never explain power
About “UVC”:
- USB Video Class (UVC) is a USB video standard, but a standards term doesn’t guarantee iPhone support—use it as a clue, then verify the real iPhone workflow. (USB-IF: USB Video Class docs)
Questions to ask before you buy (especially for wired devices):
- “What is the exact iPhone setup flow (steps 1–2–3)?”
- “Which adapter(s) and power method do you recommend for iPhone?”
- “What iOS app is required, and is it on the App Store?”
- “If it’s Wi-Fi, do I need to join a device SSID with no internet?”
“Claim → check → implication” mini-table (fast verification)
| Seller/listing claim | What to check | What it usually implies |
|---|---|---|
| “Works on iPhone” (no steps) | iOS screenshots + iPhone-specific instructions | Ambiguous; expect mismatch risk |
| “Wi-Fi endoscope” | SSID + named iOS app | SSID pairing + companion app |
| “QR code to download app” | App Store developer identity | Vendor workflow required |
| “Type-C endoscope” | Power + iPhone workflow details | Connector fit only; verify workflow |
If you’re shopping, the “best endoscope” is the one that matches your environment and your compatibility risk tolerance.
Choosing the best endoscope hardware for iPhone (Wi-Fi vs wired trade-offs)
The best iPhone endoscope is the one that matches your environment and workflow. Wi-Fi models are common on iPhone because they avoid a complicated adapter chain, but stability depends on the device and the RF environment.
| Factor | Wi-Fi endoscope | Wired endoscope (adapters) |
|---|---|---|
| Setup friction | Lower once SSID steps are known | Higher; adapter/power chain dependent |
| Stability | Can drop in noisy environments | Can be steady if workflow is supported |
| Risk of “won’t work” | Medium | Higher if documentation is weak |
| Best fit | Quick, portable inspections | Steady viewing where the workflow is proven |
Scenario shortcuts (how many people actually decide):
- If you need maximum portability and quick setup, start with a Wi-Fi model that clearly names its iOS app.
- If you need steadier viewing and can control the setup environment, wired can be a good fit—but only when the iPhone workflow is documented.
- If you’re buying for a team, documentation quality is often more important than small spec differences.
Buying checklist (specs that matter more than the name)
- Diameter/rigidity for your access constraints
- Cable length and stiffness you can actually guide
- Adjustable lighting to reduce glare
- Rotation/mirror controls in the app
- Clear iPhone workflow documentation (often the #1 return reducer)
After compatibility, the next question is whether the app itself is trustworthy.
App safety & privacy checks (permissions, Local Network, subscriptions)
A safe endoscope app usually needs only a few permissions—use this checklist to spot apps that ask for more than the workflow requires. Local Network access can be normal for Wi-Fi endoscopes because the app needs to talk to a device on your local network. (Apple Developer: App Privacy Details)
Safety checklist:
- Prefer apps with a credible developer identity and a clear update history.
- Permission sanity:
- Local Network: often normal for Wi-Fi devices
- Photos/Files: normal if you save/export video
- Avoid unrelated permissions unless clearly explained
- Read App Privacy details and ensure the data collection matches a camera viewer.
- Be cautious with unclear subscriptions/paywalls or unusual install steps.
If the app is safe but video is blank, a structured fix beats trial-and-error.
Fix “black screen / no video” on iPhone (decision tree)
Most iPhone black screens come from the wrong SSID, missing Local Network permission, or opening the app in the wrong order. Use this quick tree to isolate the cause.
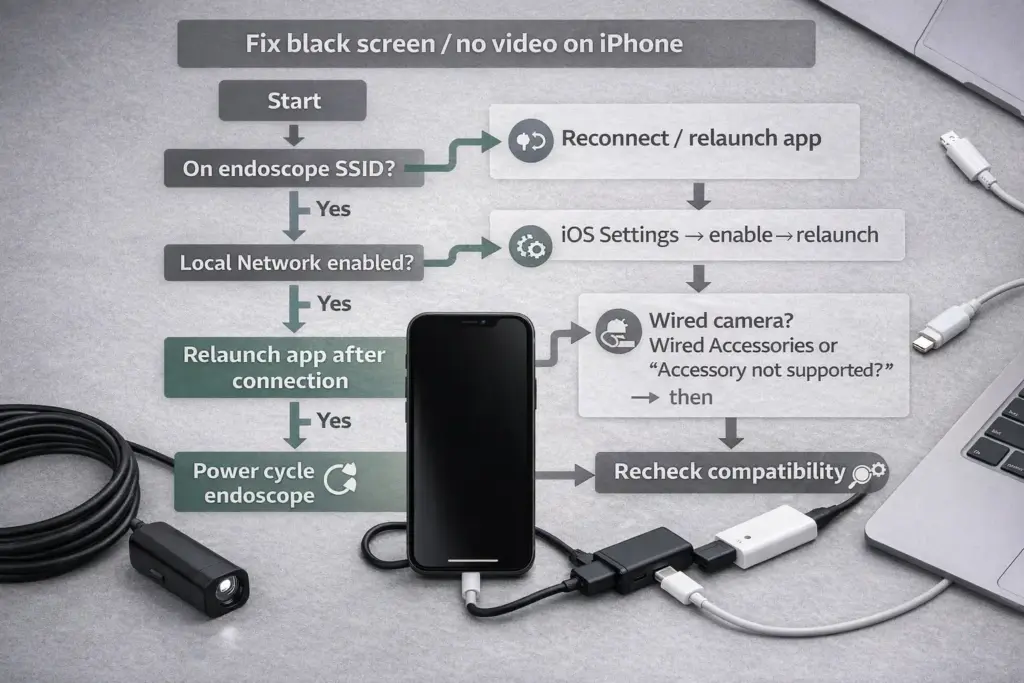
60-second checks (before deeper troubleshooting)
- You’re connected to the endoscope SSID (not your home Wi-Fi).
- Local Network access for the app is enabled (Settings → Privacy & Security → Local Network).
- You opened the app after connecting to the SSID.
- Restart the endoscope if it’s been on for a while.
Then:
- If SSID is wrong → reconnect and relaunch the app.
- If Local Network is off → enable it and relaunch. (Apple Support: Local Network access)
- If both are correct → fully close the app, reconnect to the SSID, then reopen.
- If it works briefly then drops → check network switching; stay on the endoscope SSID for the session.
- If nothing changes after a full power cycle → revisit the compatibility checklist before chasing app settings.
Once video works, the next pain point is lag and disconnects.
Reduce lag and disconnects (especially on Wi-Fi endoscopes)
Lag and drops usually come from Wi-Fi conditions or bitrate. Start with distance/interference, then reduce stream settings if the app offers them.
Environment
- Move closer to the endoscope; avoid metal-heavy barriers.
- Try a different location if the area is Wi-Fi crowded.
Workflow
- Stay on the endoscope SSID during the session (don’t switch networks).
- Close background apps; disable VPN for the session if the app behaves oddly.
- If the app supports it, pause recording while you reposition (some devices struggle while doing both).
Settings (if available)
- Lower resolution/frame rate.
- Turn off overlays/filters that add load.
If capture and sharing matter, set up your save/export path early.
Record, save, and share endoscope video on iPhone
Most endoscope apps record inside the app first, then export to Photos or Files. If export is blocked, screen recording can work.
- Tap the app’s record/camera button.
- Check the in-app gallery/album.
- Export via Share → Save Video (Photos) or Save to Files.
- If export is missing, use iPhone Screen Recording as a fallback.
If saving fails:
- Recheck Photos/Files permission for the app.
- Try exporting a short clip first (some apps fail on long recordings).
Where files usually end up:
- Photos (direct save), Files (you chose it), or an in-app gallery until exported.
If iPhone still won’t cooperate, shift to a time-saving fallback plan.
If it still won’t work: workarounds (iPad/Mac/PC) and “when to replace”
If iPhone won’t work after the checklist and decision tree, validate the hardware on another platform or replace it with a model that documents iPhone steps. The goal is to stop spending hours on a mismatch.
- Validate: confirm Wi-Fi vs cable; test on a laptop/desktop if you can (separates “device is dead” from “iPhone workflow mismatch”).
- Work around: consider an externally powered adapter/hub only if the workflow is otherwise supported; avoid buying adapters as a blind gamble.
- Replace: if documentation is vague, exchange for a model with clear iPhone instructions and iOS screenshots.
- Document: note the SSID used, the permission toggles checked, and the app you tried—support tickets resolve faster with specifics.
A quick terminology note can also help you interpret listings correctly.
Quick terms: borescope vs endoscope (what listings usually mean)
In marketplaces, “borescope,” “endoscope,” and “inspection camera” are often used loosely. What matters is the connection type, workflow, and the specs you need.
- Borescope: often mechanical/industrial inspection language
- Endoscope: often used broadly in listings (not necessarily medical)
- Inspection camera: a common generic label—still verify workflow and compatibility
Here are short answers to the most common questions.
FAQ
- Q: How do I connect an endoscope to an iPhone?
A: If it’s Wi-Fi, join the endoscope SSID, open the app, and allow Local Network access; if it’s wired, verify the adapter/power chain and the device’s documented iPhone workflow first. - Q: What apps do you use for an endoscope camera on iPhone?
A: Use the app your endoscope workflow requires—start with the manual/QR code or brand listing, then verify the developer identity and permissions in the App Store. - Q: How can I tell if my endoscope camera will work with iPhone?
A: Look for a clear connection type, iPhone-specific setup steps, a named iOS app or documented workflow, and stated adapter/power needs for wired devices. - Q: Do USB endoscope cameras work on iPhone 15 (USB-C)?
A: Sometimes, but not always—USB-C helps the connector fit, but workflow/protocol and power/adapter details still decide whether video will appear. - Q: Why does my endoscope app show a black screen on iPhone?
A: Most black screens are SSID + permission issues—confirm you’re on the endoscope SSID, enable Local Network access, and relaunch the app after connecting. - Q: Is it safe to use random endoscope camera apps on iPhone (permissions/privacy)?
A: It can be, but check developer identity, App Privacy details, and permission scope; avoid apps that request unrelated permissions or hide subscriptions. - Q: How do I record and save endoscope video on iPhone?
A: Use the app’s record button, export to Photos/Files when available, and use screen recording as a fallback if export is limited.
If you’re designing an inspection camera product, workflow clarity is the biggest lever for reducing support tickets.
(Optional) For OEM/product teams: designing an “iPhone-friendly” endoscope workflow
An iPhone-friendly endoscope experience is mostly a workflow problem—make setup verifiable, minimize steps, and handle permissions clearly.
- Document the connection model (Wi-Fi SSID vs wired accessory workflow) with iOS screenshots.
- Guide users through SSID connection and Local Network permission in-app.
- Keep workflows consistent across hardware variants to avoid “it worked on my old one” confusion.
- Make capture/export predictable (Photos/Files paths and clear share actions).
If you’re sourcing a camera module for an inspection/endoscope product, share your target iPhone connector (USB-C vs Lightning), housing constraints, cable length, and required capture workflow. Supertek supports customized camera module development and can help review workflow trade-offs before you commit to a design.
To close, here’s the shortest reusable checklist for evaluating an endoscope on iPhone.
Summary: the decision checklist + next steps
If you remember one thing: identify Wi-Fi vs wired first—then follow the matching setup and checklist before trying random apps.
- Identify connection type (SSID vs cable/adapters).
- Verify the required iOS app/workflow and enable Local Network access for Wi-Fi devices.
- If video is blank, check SSID + Local Network + app order before reinstalling.
- If compatibility is unclear, validate on another platform or replace with a model that documents iPhone steps.
For OEM teams, a quick feasibility review (connector, power chain, workflow, enclosure constraints) can prevent costly support issues later.