If you search “best endoscope camera for Android,” the real goal usually isn’t “best brand”—it’s best chance it actually works on your phone and fits your job. This guide is built around that: compatibility first, then connection type, then the few specs that decide whether the image is usable.
Best endoscope camera for Android (decision + checklist + quick fixes)
To pick the “best” Android endoscope fast, start with the USB vs Wi-Fi choice, run a compatibility gate, and keep three quick fixes ready for the most common failures. Most buyer regret comes from skipping one of those steps.
Decision rule: USB vs Wi-Fi (what to pick first)
If your phone reliably supports USB-OTG, a wired (USB-OTG) endoscope is usually the simplest and most stable option; if OTG/adapter behavior is uncertain (or you want to avoid port issues), a Wi-Fi endoscope is often the safer compatibility bet.
Android compatibility gate (before you buy): OTG → adapter → app → first image test
An “Android-compatible” endoscope is one that matches (1) your phone’s USB host capability (OTG), (2) your port/adapter situation, and (3) an app/protocol that can actually display the stream—and you can verify that with a quick first-image test.

Top 3 quick fixes when it won’t work (not detected / black screen)
If you’re stuck, these fixes solve a large share of “doesn’t work” cases without brand-specific hacks:
- Swap the weak link first: try a different OTG adapter/cable, then re-plug after the app is open (some phones enumerate differently depending on order).
- Force the permission path: make sure your app is allowed to access the USB device (you may see a USB permission prompt).
- Isolate the culprit: test the same endoscope on a second Android phone (or a PC). If it works there, your phone/adapter/app chain is the issue—not the camera head.
Fast Answer Box (compact decision + checklist)
| What to do | Best quick rule | What to check | What to try if it fails |
|---|---|---|---|
| Choose connection type | USB if OTG is solid; Wi-Fi if OTG is uncertain | OTG support, port type, adapter quality | Switch connection type if compatibility is the blocker |
| Confirm compatibility | “OTG → adapter → app → first image” | USB permission prompts, app reputation, simple setup | Try app order changes + second-device test |
| Avoid common failures | Prepare for “not detected” and “black screen” | Loose connectors, power stability, Wi-Fi dropouts | Adapter swap, re-plug sequence, short-range Wi-Fi test |
What “Android-compatible” really means (OTG, adapters, apps)
After the quick decision, the most important thing to understand is this: Android compatibility is a chain, not a label. If any link breaks—OTG, adapter, app/protocol, permissions—you can end up with “detected but black screen.”
Borescope vs endoscope (and why the name doesn’t matter for buying)
In shopping listings, “borescope,” “endoscope,” “snake camera,” and “inspection camera” are often used interchangeably. What matters for buying is the same either way: how it connects to your Android device and whether the probe fits your inspection task.
USB OTG + adapters: the most common “works vs doesn’t work” divider
If you’re buying a wired endoscope, USB host mode (OTG) and the adapter are the #1 compatibility divider—more than the camera’s headline resolution. In USB host mode, Android acts as the host that powers the bus and enumerates connected USB devices.
Practical takeaways:
- Confirm OTG support for your phone model (spec sheet, settings, or a known OTG device).
- Treat adapters as a real variable: “works on one adapter but not another” is common enough that swapping adapters is a valid isolation test.
- Expect a permission step: many Android apps must request user permission to access a USB device before showing a stream.
If you’re evaluating deeper “why,” Android’s USB host overview is the most reliable baseline reference.
USB-OTG vs Wi-Fi endoscopes: which should you choose?
Once you’ve accepted that compatibility is a chain, the best choice becomes clearer: USB endoscopes tend to win on stability and simplicity when OTG is reliable, while Wi-Fi endoscopes tend to win when you want to bypass OTG/port friction.
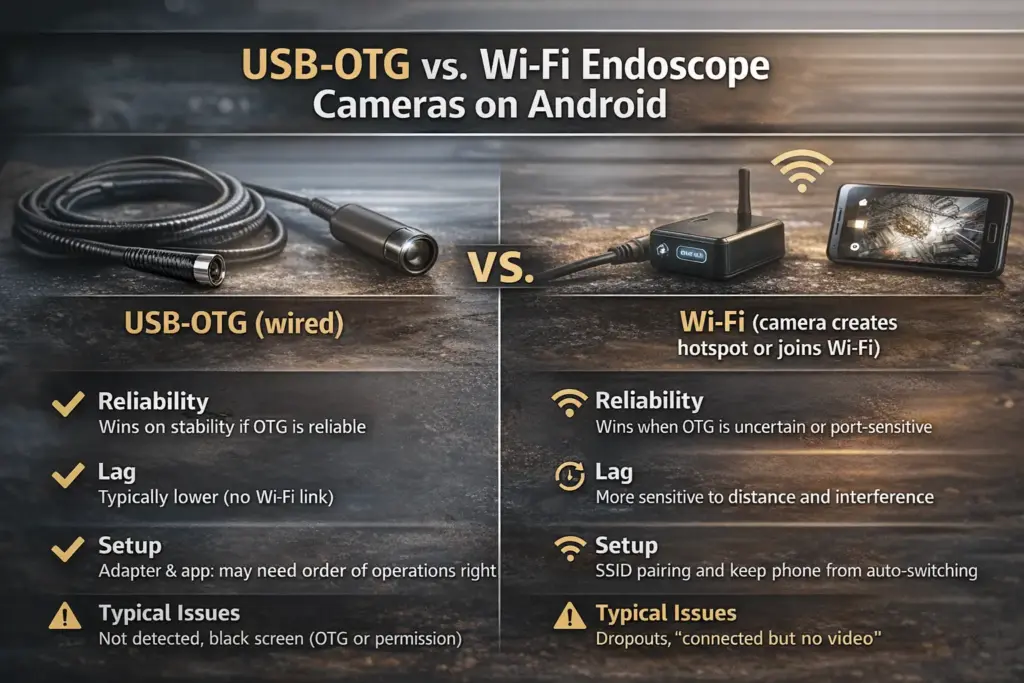
Comparison table: reliability, lag, setup, power, and common failure modes
| Factor | USB-OTG (wired) | Wi-Fi (camera creates hotspot or joins Wi-Fi) |
|---|---|---|
| Reliability | Often steadier once detected; fewer “radio” variables | Can drop in crowded RF environments; network switching can interfere |
| Lag | Typically lower (no Wi-Fi link), but varies by device/app | Can feel laggier; more sensitive to distance/interference |
| Setup friction | OTG + adapter + USB permission + viewer app | Pair to camera SSID + keep phone from auto-switching networks |
| Power | Phone may power the device; power draw can be a factor | Camera has its own battery (often), but phone Wi-Fi use can drain battery |
| Common failure modes | Not detected (OTG/adapter), or black screen (permission/app order) | Dropouts, “connected but no video” (wrong app order), phone auto-switching networks |
| Best when… | You can confirm OTG and have a solid adapter | OTG is unreliable, or you prefer “no physical data cable to phone” |
Choose USB if… / Choose Wi-Fi if… (simple rules by scenario)
Choose USB-OTG if:
- Your phone reliably supports OTG and you have a good USB-C OTG adapter
- You want the simplest workflow and fewer wireless variables
- You’re doing close, methodical inspections (automotive bays, tight indoor work)
Choose Wi-Fi if:
- OTG/adapter behavior is uncertain (or you’ve been burned by “not detected”)
- You want to avoid hanging hardware off your phone port while you work
- You can work at short range and can control interference (step away from crowded routers)
Specs that matter for inspection results (and what’s mostly marketing)
After connection type, the “best” endoscope is the one whose working distance, probe size, lighting, and cable handling match the real geometry of your job. “Resolution” can matter, but it’s rarely the first cause of disappointment.
The #1 reason cheap endoscopes disappoint: working distance and focus (not “pixels”)
If your image is blurry up close, the most likely cause is working distance/focus mismatch, not that the camera is “low resolution.” Many probe tips are fixed-focus, so you’ll get the sharpest image only at the designed distance—move slightly back, adjust lighting, and re-center the subject before assuming the camera is bad.
Mini-table: match your job to the specs (distance, diameter, lighting, cable)
| Job | What usually matters most | Common “gotcha” to plan for |
|---|---|---|
| Automotive (engine bay, behind panels) | Semi-rigid cable control, decent lighting, workable distance | Too-long cable becomes hard to steer |
| Drains/plumbing | Cable length + stiffness balance, wet-use durability habits | “Waterproof” assumptions without care shorten lifespan |
| Home/DIY (walls, vents) | Ease of setup, stable connection, decent lighting | Buying before verifying OTG/adapter/app chain |
| Electronics/small cavities | Small probe diameter, stable focus at short range | Fixed-focus tips can blur if you’re too close |
Best type by use case: automotive, drains, home, electronics
Now that you know the specs that matter, the best purchase is usually “best for your access constraint”—probe diameter, cable stiffness, and tip view dominate the decision more than a brand name.

Scenario table: what to prioritize (diameter, stiffness, lighting, view)
| Use case | Prioritize | Nice-to-have | Watch out for |
|---|---|---|---|
| Automotive | Semi-rigid cable you can steer; strong lighting | Side-view or dual-lens tips | Long cables reduce controllability in tight routes |
| Drains/plumbing | Cable reach + manageable stiffness; easy cleaning habits | Strain relief at the handle | “Waterproof” isn’t the same as “safe in any drain chemistry” |
| Home/DIY | Setup simplicity; stable connection | Quick photo/video capture | Adapter/app compatibility surprises |
| Electronics | Smaller probe diameter; stable short working distance | Mirror accessory for awkward angles | Blurry close-up if you’re inside the minimum focus distance |
Setup on Android: USB path vs Wi-Fi path (step-by-step)
After choosing the right type, getting a first image usually comes down to doing setup steps in the right order and allowing the app to access the device. Android’s USB host model is the baseline for understanding why detection and permission steps exist.
USB-OTG setup steps (wired endoscopes)
If you’re using USB-OTG, the fastest reliable workflow is:
- Confirm OTG is supported on your phone model (and enabled if your device has an OTG toggle).
- Use a true OTG adapter (especially on USB-C phones).
- Install the manufacturer-recommended viewer app first; if none is provided, choose a reputable USB camera viewer app with clear permissions and support info.
- Open the app, then plug in the endoscope (if it doesn’t show up, try plugging in first, then opening the app—order can matter).
- Accept the USB permission prompt if it appears; without permission, you may see a black screen.
- Verify the first image in a well-lit test (your desk), then move to the real inspection.
For “plug-and-play USB camera” behavior on the platform side, Android’s external USB camera support is documented for the system stack (useful context even if apps vary).
Wi-Fi setup steps (hotspot pairing + app workflow)
If you’re using Wi-Fi, the most common failure is being on the “right Wi-Fi” but still not getting video. Try this flow:
- Power on the endoscope and wait for its Wi-Fi SSID to appear.
- Connect your phone to the camera’s SSID (many models create a local hotspot).
- Stay connected even if Android warns “no internet”—some phones try to auto-switch back to a known network.
- Open the endoscope app and select the correct camera/stream if prompted.
- Test at short range first, then move into the job area.
Recording photos/video + file export (quick tips)
Once you have a stable stream, use the app’s capture controls for photos/video and confirm where files are saved (gallery vs app folder). If recording is missing or low quality, try another viewer app that supports your device, because capture features can vary by app and by camera stream format.
Troubleshooting: not detected, black screen, disconnects (ordered flow)
If setup didn’t work, the fastest path is to troubleshoot by symptom and isolate whether the problem is your phone, adapter, app/permission chain, or the camera itself.

If it’s not detected at all (USB) / If you can’t see the camera SSID (Wi-Fi)
USB: Not detected
1) Confirm OTG support (and enable OTG if your phone has a toggle).
2) Swap the OTG adapter/cable (the adapter is a frequent single point of failure).
3) Try changing the order: app open → plug in, or plug in → app open.
4) Test on a second device (another Android phone or a PC).
5) If it’s still not detected anywhere, treat it as likely defective.
Wi-Fi: SSID not visible
1) Ensure the camera is charged/powered on long enough to broadcast.
2) Restart the endoscope and rescan Wi-Fi networks at close range.
3) Test in a lower-interference location and keep the phone close.
4) If the SSID never appears on any device, suspect a power or hardware issue.
Detected but black screen (USB): permission/app order + power stability checks
If Android “sees something” but you get a black screen, the cause is often permission, app/protocol mismatch, or marginal power/connection:
- Reopen the app and replug the endoscope to trigger the USB permission dialog.
- Try the manufacturer’s recommended app first; then try a reputable alternative viewer.
- Check for a loose connector—streaming can fail even if enumeration succeeded.
- Reduce load: close background apps, and test in a stable environment.
- Swap adapters again; power and signal integrity vary widely across adapters.
Disconnects and lag (Wi-Fi): interference + phone network switching + cable strain
If Wi-Fi video drops or lags:
- Stay close range and reduce obstacles; test near the endoscope first.
- Turn off “auto-switch”/smart network features if your phone keeps leaving the camera SSID.
- Move away from crowded routers or heavy interference areas.
- If the endoscope is used with a flexible probe, avoid sharp bends and strain that can cause intermittent behavior.
Durability & waterproofing: what IP ratings mean in practice + care checklist
After it works, your next risk is assuming “waterproof” means “safe anywhere.” IP ratings are defined in IEC 60529 as a way to grade enclosure protection against dust and liquids under specific test conditions—not a promise for every real-world drain or chemical exposure.
Care checklist (before / during / after wet use)
Before wet use:
- Inspect the probe tip and cable for nicks, cracks, or loose strain relief.
- Keep your viewing device away from splashes (especially with wired setups and adapters).
During use:
- Avoid forcing the probe around sharp bends; repeated stress is a common early failure driver.
- Don’t assume chemical resistance—drains can contain cleaners that exceed what a basic seal tolerates.
After use:
- Rinse/clean according to the product’s guidance (if provided), then dry thoroughly.
- Store the probe without tight coils or sharp kinks.
- If you see fogging/condensation at the tip, let it dry completely before the next use.
If you need a quick official reference on what “IP ratings” mean conceptually, IEC’s overview is the most authoritative public starting point.
For OEMs/builders: what to specify for a custom inspection camera/endoscope subsystem
If you’re building an inspection camera into a product (rather than buying a consumer endoscope), the “best” outcome comes from clear requirements up front—especially working distance, tip diameter constraints, lighting, and environment.
Requirements checklist you can send to a supplier (copy/paste)
- Use case: what are you inspecting, and in what space constraints?
- Working distance: typical distance from tip to target surface
- Field of view: wide vs narrow preference (what must be seen)
- Tip outer diameter (OD): maximum diameter you can physically pass through
- Cable length + stiffness: reach vs controllability requirements
- Lighting: target brightness behavior (fixed vs adjustable), glare concerns
- Environment: wet/dust/temperature/vibration/chemicals exposure conditions
- Host constraints: interface preference (USB/MIPI), power budget, mechanical envelope
- Validation priorities: focus consistency, ingress risk testing approach, strain/bend durability, image stability
If you have the working distance, tip diameter limit, and your host/interface constraints, you can share those as a starting point for a feasibility review of a custom camera module or inspection camera subsystem.
FAQ (Android endoscope cameras)
Will a USB endoscope work with my Android phone?
It can—if your phone supports USB host mode (OTG), you have a proper OTG adapter, and your app can access the USB device. If it’s “not detected,” swap adapters and test on a second device before blaming the camera.
USB-OTG vs Wi-Fi—what’s better for reliability?
USB-OTG is often more stable once it’s detected, while Wi-Fi avoids OTG/adapter friction but can suffer from interference or network switching. If you’ve had repeated OTG issues on your phone, Wi-Fi can be the more reliable practical choice.
What apps do you use for an endoscope camera on Android?
Start with the manufacturer-recommended app if one exists; otherwise use a reputable USB camera viewer app with clear permissions/support details. The key is that the app must be able to access the USB device (permission prompt) or connect to the Wi-Fi stream correctly.
My phone detects OTG but the endoscope shows a black screen—what should I try?
Treat it as a permission/app/streaming problem: replug to trigger USB permission, try the manufacturer app first, then a reputable alternative viewer, and swap the OTG adapter. A device can enumerate successfully but still fail streaming if power or connection is marginal.
Why is my endoscope image blurry up close, and how do I fix it?
Most probe tips are fixed-focus, so blurry close-ups often happen because you’re inside the minimum working distance. Pull back slightly, improve lighting, and re-center the subject; if the image sharpens at a small distance change, it’s a focus/working-distance issue—not just “low resolution.”
How durable are Android endoscope cameras, and what does “waterproof” really mean?
Durability depends heavily on cable strain and sealing. “Waterproof” claims often reference IP ratings, which are defined test conditions for enclosure protection—not a guarantee for every drain environment. Use careful handling and thorough drying after wet use to reduce early failures.
Summary: checklist before you buy + before you start a job
To end up with the “best” Android endoscope for you, do this:
- Pick connection type: USB if OTG is reliable; Wi-Fi if OTG/adapter behavior is uncertain
- Run the compatibility gate: OTG → adapter → app/permission → first image test
- Match the job: working distance/focus + probe diameter + cable handling matter more than headline resolution
- Plan for reality: keep quick fixes ready (adapter swap, permission/app order, second-device test)
- Treat “waterproof” carefully: follow a wet-use care routine and avoid blanket assumptions