If you’re searching for the “best endoscope camera,” you’re usually trying to avoid one of two outcomes: buying a probe that can’t physically reach the spot you need, or buying a camera that reaches—but still can’t show anything useful. This guide turns “best” into a simple, repeatable decision process: fit first, then visibility, then workflow reliability, then survivability.
The “best” endoscope camera is the one that fits your job
The best endoscope (borescope) camera is the one whose probe can reach your target and deliver a usable image in your real environment (dark, reflective, wet, oily, or dusty). Start by locking down the access constraints, then pick the connection style you’ll actually use without friction.
| Your job scenario | What to prioritize first | A practical “best-for” direction |
|---|---|---|
| Tight access (small openings, crowded cavities) | Probe fit (diameter) + controllability | Prioritize the slimmest probe that still offers workable lighting control |
| Long reach (deep cavities, long paths) | Probe length + stiffness/handling | Look for a probe that holds shape; plan a quick bend/strain check early |
| Reflective metal (pipes, engine parts) | Lighting control + focus/working distance | Favor adjustable brightness and evaluate glare before committing |
| Wet or dirty environments (drains, grease) | Sealing scope + cleanup workflow | Treat “waterproof” as a claim to verify, not a guarantee |
| Frequent professional use | Workflow reliability (connection + UI) | Simpler workflows tend to win (fewer pairing/app surprises) |
Pre-buy checklist
- Confirm the probe can physically reach (measure the opening and the path shape).
- Decide your workflow: phone-connected, Wi-Fi, or standalone screen.
- Look for controllable lighting (not just “more LEDs”).
- Check focus/working distance expectations (tight spaces punish mismatches).
- If wet use matters, verify what’s actually sealed (probe only vs whole device).
Endoscope vs borescope vs “snake camera”: what these terms usually mean
In consumer shopping, “endoscope camera,” “borescope,” “inspection camera,” and “snake camera” often point to the same general tool category: a small camera on the end of a probe used for visual inspection in hard-to-reach places. The important distinction is not the word on the listing, but the intended use and constraints.
How the terms are commonly used
- Borescope / inspection camera: A general-purpose inspection tool for engines, walls, HVAC, drains, and machines.
- Endoscope camera (consumer usage): Frequently used as a synonym for borescope in retail listings.
- Snake camera: A casual term emphasizing the flexible probe/cable form factor.
Boundary note (important)
- Medical endoscopy is a different category with its own requirements and regulations; this article is about inspection tools, not medical devices.
Choose by specs first: Probe size, length, optics, lighting, and environment
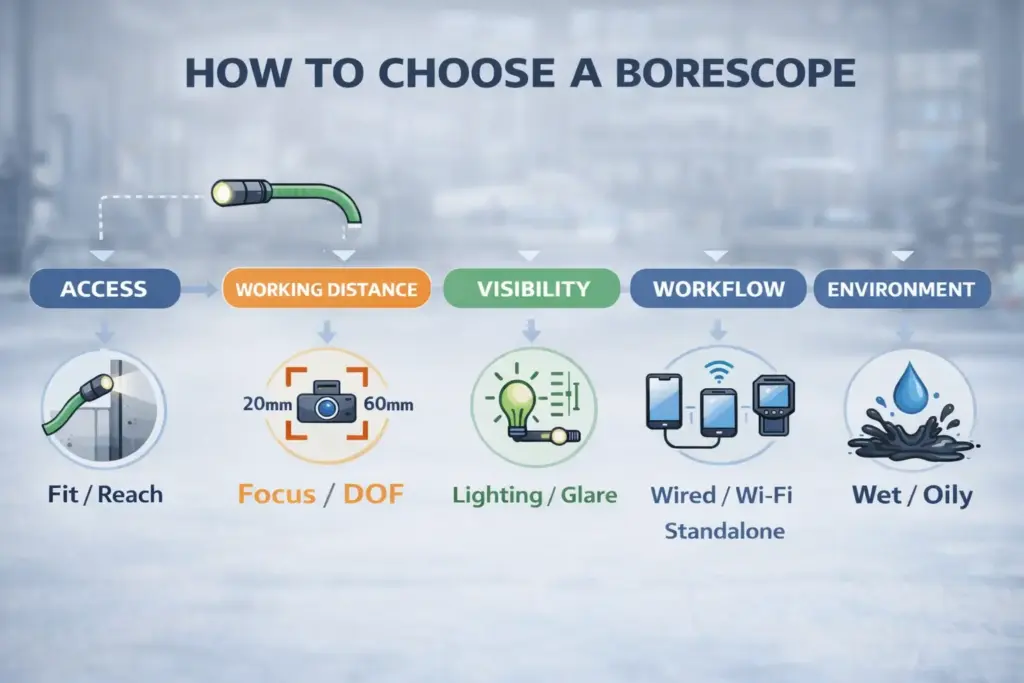
Specs matter most when they map directly to your constraints: access, working distance, visibility, workflow, and environment. Use the table below as a decision lens—then validate the short list with a quick real-world check.
| Spec / feature | Why it matters in real inspections | Quick rule you can apply |
|---|---|---|
| Probe fit (diameter) | If it doesn’t fit, nothing else matters | Measure the tightest opening and choose for that constraint first |
| Probe reach (length) | Longer reach can be harder to control and protect | Buy for the minimum reach you truly need; long probes need better handling habits |
| Focus / working distance | Close-up work fails when focus range is wrong | Assume you’ll work very close; verify the image stays sharp at your typical distance |
| Field of view (FOV) | Wider view helps orientation but can hide fine detail | Use wide view for navigation, but judge detail with a stable distance and lighting control |
| Lighting control | Bright, fixed LEDs can cause glare and washout | Adjustable brightness is more useful than “more LEDs” in reflective spaces |
| Sealing / “waterproof” | Wet use is where failures and frustration spike | Treat claims as “verify”: confirm what’s sealed and how it’s rated |
| Connection style | Reliability and friction determine whether you’ll use it | Favor the workflow you’ll actually use: stable connection beats “cool features” |
Access first: probe diameter & length (drains vs engines vs walls)
Once you know where you need to inspect, probe fit becomes the decision that prevents most regrets. Pick the smallest probe that can reach the target without turning the inspection into a wrestling match.
Key points
- Tight openings punish oversized probes; measure clearance before you buy.
- Longer probes can be useful, but they’re easier to kink, snag, or fight around bends.
- Semi-rigid probes can hold shape for navigation, while very flexible probes may need accessories or technique to steer.
A fast sizing workflow
- Identify the tightest choke point (opening, bend, or entry port) and measure it.
- Sketch the path shape (straight, gentle curve, multiple bends) and estimate how you’ll guide the probe.
- Choose for fit first, then for reach, then for handling.
Boundary conditions
- “Thinner is always better” isn’t true if it sacrifices lighting control or durability for your use.
- A probe that fits but can’t be steered can be nearly as frustrating as one that doesn’t fit.
Visibility: FOV/DOF/focus distance and why “1080p” isn’t the whole story
After fit, usable visibility is usually limited by focus behavior, working distance, and lighting—not by the headline resolution on a product page. In tight spaces, the camera is often very close to the target, and that’s where focus range and glare control decide whether details are readable.
Key points
- Depth of field (DOF) and focus distance determine whether close-up areas stay sharp.
- Field of view (FOV) changes how easy it is to orient yourself; very wide views can exaggerate distortion.
- Exposure handling matters because reflective surfaces can blow out highlights and hide detail.
Quick evaluation idea
Test at the distances you’ll actually use (very close, close, and “arm’s length” inside a cavity), changing brightness and angle to see if details survive.
Boundary conditions
- Image results depend heavily on reflectivity and distance; avoid assuming a spec alone guarantees clarity.
Lighting & glare: what to look for (and what causes washout)
Lighting is the most common “hidden” spec because it determines contrast and readability in dark, reflective places. The best lighting feature is rarely maximum brightness; it’s controlled brightness that you can tune to the scene.
Key points
- Reflective metal + close distance often creates washout.
- Adjustable brightness helps you “dial down” glare and recover detail.
- Small changes in angle and distance can dramatically reduce reflections.
Boundary conditions
- More LEDs can worsen glare if you can’t reduce brightness.
- Some “blurriness” is simply a focus-range limitation at very close distances.
Phone (wired) vs Wi-Fi vs standalone screen: which is most reliable for your workflow?
The most reliable option is usually the one with the fewest moving parts in the workflow: fewer pairing steps, fewer app dependencies, and fewer “it worked yesterday” surprises. That said, “reliable” also includes practical ergonomics—where your hands, phone, and probe need to be during the inspection.

| Connection type | Most reliable when… | Typical pitfalls to watch for |
|---|---|---|
| Wired to phone/PC (USB/USB-C) | You want minimal latency and fewer dropouts | Phone compatibility can be device/app dependent; adapters/hubs add friction |
| Wi-Fi borescope | You want cable-free convenience and can tolerate setup steps | Pairing issues, app quality, latency, and dropouts in noisy environments |
| Standalone screen | You want a dedicated tool that “just works” | Bulkier device; screen quality and battery life vary by model |
Compatibility checklist for phone-based use
- Confirm the connector you’ll use (USB-C vs USB-A via adapter) and whether you already have the right adapter/hub.
- Check whether the device expects a specific app (and whether it’s maintained).
- Plan a quick test on day one: live view, recording, and file access.
Reference links (definitions and adapter basics)
- USB-IF’s video class document library (UVC): Video Class v1.5 document set
- Apple’s official adapter overview (for USB-C to USB): About the Apple USB-C to USB Adapter
Boundary conditions
- “Works with all phones” is rarely a safe assumption; treat it as a claim to verify.
- Software updates can change behavior; verify your exact workflow early.
Wired (USB/USB-C): when it’s simplest, and what to verify on phones and PCs
Wired connections are often the simplest in practice because they reduce pairing steps and usually provide a more stable link than Wi-Fi. The main caveat is host compatibility—especially on phones—so treat “plug and play” as something to confirm, not assume.
Key points
- Wired setups reduce variables: no pairing, no wireless interference, fewer dropouts.
- Adapters matter: the wrong adapter can turn a “simple” workflow into a troubleshooting session.
- PCs are often easier to validate quickly because you can test live view and capture paths with fewer mobile constraints.
A quick wired validation
- Connect via your intended adapter/hub.
- Confirm live video works for at least a few minutes without disconnecting.
- Record a short clip and confirm you can find and share the file.
Boundary conditions
- Even with UVC-class devices, host behavior can vary; confirm your actual device/app workflow early.
If wired feels too limiting for your use, Wi-Fi can be convenient—but it’s the option that benefits most from a “verify early” mindset.
Wi-Fi models: best-for convenience, common failure modes, and how to avoid surprises
Wi-Fi borescopes can be convenient when you need freedom of movement, but they add more dependencies (pairing, app behavior, battery, and RF conditions). If convenience is the goal, you’ll get better outcomes by testing the entire workflow immediately rather than discovering issues mid-job.
Key points
- Pairing and app UX are frequent pain points; quality varies widely by model.
- Latency and dropouts tend to show up in challenging environments (tight metal cavities, crowded RF spaces).
- Battery and heat management can influence stability during longer inspections.
A “day-one” Wi-Fi check
- Pair and connect from your real work area (not just your living room).
- Test for latency while moving the probe; watch for freeze or disconnect patterns.
- Record and confirm file handling (where it saves, and how to export).
Boundary conditions
- Wi-Fi performance is environment-dependent; verify in conditions that resemble your real use.
Image quality beyond “1080p”: what actually changes what you see
Better image quality in a borescope is usually about usable focus and contrast at close range, not just pixel count. If you can’t focus where you need to work—or if glare wipes the scene—higher resolution won’t help much.
What tends to matter most
- Focus behavior at close range: details often live in very small, near-field areas.
- Lighting control: the difference between “washed out” and “readable” is often brightness control and angle.
- Stability and controllability: a steady probe at a consistent distance improves perceived clarity more than specs suggest.
A simple evaluation checklist
- View a textured target at your typical working distance (close and very close).
- Reduce brightness and adjust angle to see if detail returns on reflective surfaces.
- Confirm recording doesn’t significantly degrade clarity compared with live view.
Boundary conditions
- Scene reflectivity and distance can dominate results; test on representative surfaces rather than trusting a single spec line.
Troubleshooting: why images wash out or look blurry in shiny pipes
Most “bad borescope image” complaints come from a few repeatable causes: too much light at too close a distance, strong reflections, a dirty lens cover, or a focus range that doesn’t match the task. The fastest fixes start with brightness and distance, then move to angle and cleaning.
Common causes → fastest fixes
- Washed-out glare (white hotspots): lower LED brightness, increase distance slightly, and change the viewing angle.
- Overall haze or softness: clean the lens cover window and re-test.
- Blurry detail at very close range: pull back slightly to match the focus range; stabilize the probe.
- Flicker or exposure hunting: reduce brightness and hold distance steady for a moment.
60-second “does it get better?” test
- Reduce brightness to the lowest useful setting.
- Back off a small amount and re-approach slowly until detail looks best.
- Change angle slightly to avoid direct reflections.
- Clean the lens window and repeat steps 1–3.
Boundary conditions
- Some blur is a focus-range limitation, not a defect; small distance changes can matter a lot.
Waterproof and harsh environments: what “waterproof” and IP ratings mean—and what to verify
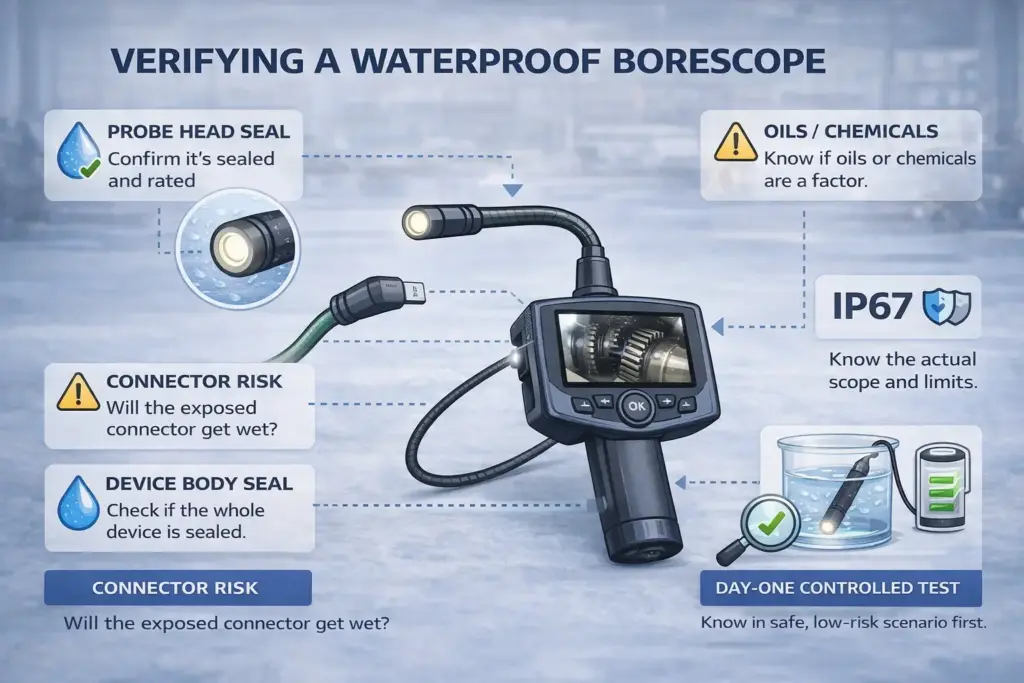
“Waterproof” isn’t a single, universal promise; it’s a claim that depends on what is sealed, how it’s tested, and what environment you’re actually in (water vs oily water vs chemicals). IP ratings exist to standardize parts of this conversation, but you still need to confirm scope and limits.
IP ratings in plain language
- IP codes describe degrees of protection provided by enclosures against solids and liquids under defined test conditions. IEC provides an overview here: Ingress Protection (IP) ratings.
- The two-character structure matters: one part addresses solid protection, another addresses water protection; “X” means “not rated” for that part.
- Some levels (especially immersion-related ratings) can depend on manufacturer-stated test conditions, so always look for the details.
What to verify before wet use (practical checklist)
- Scope of sealing: is the rating for the probe head only, or the entire device (screen unit, battery compartment, connectors)?
- Connector exposure: will the connector or phone adapter be near water? If yes, treat it as a risk point.
- Cleaning guidance: confirm what cleaning is safe for the lens window and seals (avoid harsh solvents unless specified).
- Environment reality: drains and engines can involve oils/grease; water resistance alone may not cover chemical exposure.
- Day-one wet simulation: test in a controlled, low-stakes environment before relying on it for a real job.
Boundary conditions
- IP ratings apply under defined conditions and may not cover every real-world contaminant (oils, solvents, abrasive grit).
- Even “rated” products can fail if seals are damaged by handling, debris, or sharp edges.
When premium features are worth it: articulation, dual-lens/side-view, and accessories
Premium features are worth it when they solve a geometry problem you can’t solve with technique or a simple accessory. If your inspections are mostly straight-line views, these features can add cost and complexity without improving results.
Buy if / skip if triggers
- Articulation (steerable tip): buy if you regularly need to look around corners or past obstructions; skip if most targets are visible with simple repositioning.
- Dual-lens or side-view: buy if you need to inspect sidewalls or check behind features without pulling the probe out repeatedly; skip if a mirror attachment covers your needs.
- Accessories (hooks/magnets/mirrors): buy if retrieval or side inspection is part of the job; skip if you only need visual confirmation.
Boundary conditions
- Extra mechanisms can add failure points; treat durability as something to validate early.
- Technique and lighting control often outperform feature creep for many jobs.
Avoid buyer regret: common mistakes + return-window validation checklist
Most bad purchases happen because buyers optimize for a single spec (like resolution) and ignore fit, lighting control, workflow friction, or sealing scope. You can reduce risk quickly by running a few targeted tests while you still have an easy return path.
Common mistakes → what to do instead
- Buying a probe that’s too large: measure clearance first and choose for fit.
- Chasing resolution over visibility: prioritize lighting control and focus behavior at your working distance.
- Assuming phone compatibility: verify your adapter/app workflow on day one.
- Treating “waterproof” as universal: confirm what’s sealed and test gently before relying on it.
- Ignoring handling and durability basics: avoid sharp bends, protect the probe tip window, and store it to prevent kinks.
Return-window validation checklist (quick tests that matter)
- Fit test: confirm it reaches the target path without forcing bends.
- Visibility test: check clarity at close range on a representative surface (including reflective metal if relevant).
- Lighting test: verify brightness control prevents washout and recovers detail.
- Workflow test: confirm live view + recording + file access on your real device.
- Handling test: gently bend and hold shape (as appropriate) and confirm nothing intermittently disconnects.
- Environment test: if wet use matters, do a controlled exposure test consistent with the product’s stated scope.
Boundary conditions
- Early tests reduce risk but cannot fully guarantee long-term durability; they simply help you catch obvious mismatches quickly.
If you’re building an inspection device: OEM camera module spec sheet + RFQ checklist
For OEM teams, the “best endoscope camera” is the one that meets your device constraints with minimal iteration: probe fit, optics, lighting, interface, and sealing all interact. A clear RFQ checklist saves time by preventing “we built it, but it doesn’t work in your enclosure” surprises.

Step-by-step: turning your inspection need into a module spec
- Define the inspection environment: dry, wet, oily/greasy, dusty, temperature range, cleaning method.
- Lock the access constraints: probe tip size limits, required reach, and bend path geometry.
- Set the working distance target: where the camera must be sharp most of the time.
- Describe visibility needs: reflective surfaces, low light, and whether you need adjustable illumination.
- Choose the interface direction: USB-style workflows can simplify integration in some architectures, while MIPI-style integration is common for embedded systems; the best choice depends on your host platform, latency/bandwidth goals, and software stack.
- Call out sealing scope: what must survive immersion/splash, and where connectors will live.
- Plan validation: define a simple acceptance test (fit, visibility, recording, sealing checks) before scaling production.
Copy/paste RFQ checklist
- Use case and environment (wet/oily/dust/cleaning, temperature)
- Probe constraints (tip size limit, reach, bend path description)
- Working distance and field of view expectations (what must be sharp, how wide you need to see)
- Lighting requirements (brightness control, reflection-heavy surfaces)
- Interface preference and host constraints (USB-style vs embedded camera interface; OS/SoC details)
- Mechanical notes (lens window material/shape, sealing zones, strain relief expectations)
- Validation plan (what you will test on the first prototypes)
If you want feedback on feasibility (sensor/lens/interface/sealing trade-offs), share your probe constraints, environment, and host platform. Supertek describes its camera module customization scope (hardware/software/firmware) and interface experience on its site: Camera Modules Customization and About Us.
Boundary conditions
- Requirements and integration risks vary by platform and enclosure; avoid treating any one interface as universally “best.”
- If your application enters regulated territory (e.g., medical), use the relevant official requirements and qualified experts to define compliance.
With the core decisions covered, the FAQ below provides quick, extractable answers to the most common follow-up questions.
FAQ
- Q: What is the difference between a borescope and an endoscope camera?
A: In consumer shopping, the terms often refer to the same type of inspection tool—a camera on a probe used to look into hard-to-reach spaces. “Endoscope” can also mean medical equipment in other contexts, so rely on the intended use and specs, not the listing keyword. - Q: What should you look for in an endoscope (borescope) camera?
A: Start with probe fit (size and reach), then verify close-range focus and controllable lighting. After that, choose a workflow you’ll actually use (wired, Wi-Fi, or standalone) and treat “waterproof” claims as something to verify—especially for wet/oily jobs. - Q: Phone-connected vs Wi-Fi vs standalone: which should I buy for reliability?
A: If reliability is the priority, simpler workflows usually win: fewer pairing steps and fewer app dependencies reduce surprises. Wi-Fi can be convenient but benefits most from early validation, while standalone units can reduce phone/adapter friction at the cost of bulk. - Q: What is the best endoscopy camera for iPhone (USB-C vs adapter)?
A: The best option is the one that works reliably with your specific iPhone and adapter workflow, so verify compatibility early. Start by confirming whether you’ll connect via USB-C directly or through a USB adapter/hub, then test live view and recording during your return window. - Q: What does “waterproof” mean for a borescope, and what should you verify?
A: “Waterproof” is only meaningful when you know what parts are sealed and what test conditions the rating assumes. Verify the scope (probe head vs whole device), connector exposure risk, cleaning guidance, and whether your environment includes oils or chemicals that may not be covered by a water-only claim. - Q: Why does my borescope image look washed out or blurry in metal pipes?
A: Reflective metal plus strong LEDs at close range often causes glare and washout, and very close distances can exceed the focus range. Reduce brightness, back off slightly, change angle, and clean the lens window—those steps resolve most cases quickly. - Q: What are the most common mistakes when buying an endoscope camera?
A: The biggest mistakes are buying a probe that doesn’t fit, chasing resolution instead of visibility, and assuming compatibility or “waterproof” claims without verification. A short return-window test plan (fit, glare, workflow, and basic handling checks) catches most mismatches early.
Summary: pick-your-next-step recap
If you remember only a few things, make them these:
- Fit first: probe size and reach decide whether the inspection is possible.
- Visibility is usually focus + lighting control, not headline resolution.
- Reliable workflow beats fancy features you won’t use (verify compatibility early).
- “Waterproof” is a verification topic—confirm scope and limits before relying on it.
- A short return-window test plan reduces regret fast.
Practical next steps
- DIY / trades buyers: measure clearance → choose workflow → validate glare + recording on day one → verify wet-use scope if needed.
- OEM / engineering teams: turn your constraints into an RFQ checklist (interface, optics, sealing, lighting control) before requesting samples.
- If you need help choosing an interface or building a custom module: prepare your environment + access constraints + host platform details so a supplier can propose options and trade-offs efficiently.