Articulating endoscope camera
An articulating endoscope (borescope) camera is an inspection camera with a steerable tip—so you can change the viewing direction inside tight spaces instead of only seeing straight ahead. You need articulation when your access path has bends, obstacles, or “look-around-the-corner” targets; otherwise, a simpler flexible (non-steerable) scope may be enough.
- Articulating = steerable tip, not just a flexible cable.
- Choose 2-way articulation for simpler up/down steering; choose 4-way when you need more precise positioning around obstacles.
- Ignore “resolution-first” shopping: prioritize probe diameter + tip length, focus/working distance (DOF), field of view (FOV), lighting control (glare), and environment/sealing.
- “360° articulation” is often marketing shorthand—verify the actual steering directions and limits.
- For OEM builds, decide early: finished device (fastest path) vs camera head/module (more control, more integration work).
Boundary note (important): This guide focuses on inspection/industrial use cases. If your use is medical or regulated, requirements, validation, and compliance obligations can be very different.
What “articulating” means (and when you actually need it)
“Articulating” means the camera’s viewing tip can be actively steered—typically by a handle control—so you can aim the camera head at different angles while the insertion tube stays in place. You need articulation when your target isn’t visible along a straight line from the access port (for example, around a bend, behind a bracket, or above a surface you can’t align with).
Articulating vs flexible: the simplest way to tell
A quick mental model: flexible describes how the tube bends; articulating describes whether the tip’s viewing direction can be controlled.
- Flexible but non-articulating: the tube bends, but the camera usually looks forward; you reposition the whole tube to change what you see.
- Articulating: the tube may be flexible, but the tip can be steered, so the camera can look up/down (2-way) or up/down/left/right (4-way) without repositioning as much.
When articulation is worth it (typical triggers):
- You must inspect surfaces that are offset from the access path (e.g., sidewalls, behind features).
- You need repeatable “aim-and-hold” viewing to document defects (rather than sweeping).
- The access route is tight and re-positioning the whole probe is hard or risky.
When articulation might be unnecessary:
- The target is usually in-line and you can rotate or reposition the probe easily.
- You want maximum simplicity, lower maintenance risk, or lower cost for routine checks.
2-way vs 4-way (and what “360° articulation” usually means)
2-way articulation steers the tip in two directions (commonly up/down), while 4-way articulation steers in four directions (up/down/left/right). “360° articulation” is often used loosely to suggest “all-around steering,” but you should verify the actual direction control and steering limits rather than relying on the label.
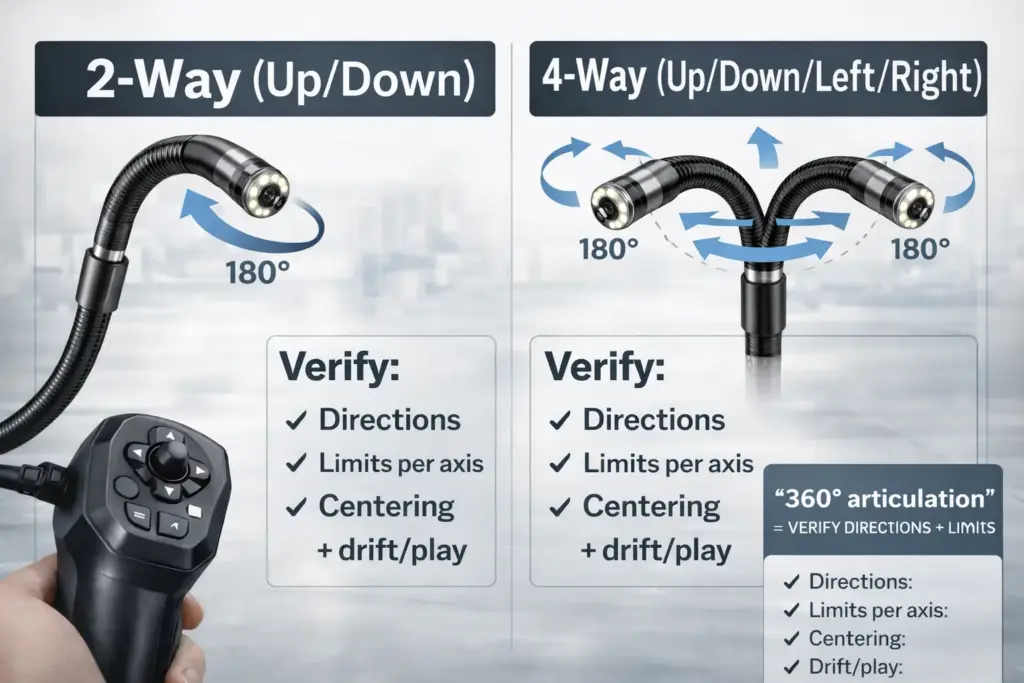
| Feature | 2-way articulation | 4-way articulation |
|---|---|---|
| Tip control | Up/down (two directions) | Up/down/left/right (four directions) |
| Best fit | Simple “look up/down” around a bend; faster learning curve | Complex inspection paths; more precise aiming around obstacles |
| Typical trade-offs | Often simpler mechanism | Often more complex mechanism; more things to validate for durability |
| What to verify | Steering limits, repeatability, tip stiffness | Steering limits in each axis, repeatability, control feel, drift/play over time |
Quick verification checklist for articulation claims
If you’re comparing listings or supplier quotes, these questions reduce “marketing-spec” confusion:
- Directions: Is it truly 2-way or 4-way? (Ask for “up/down/left/right” explicitly.)
- Limits: What are the steering limits (in each direction) and how are they defined/measured?
- Control method: Wheel, joystick, lever, motor-driven—what exactly is used, and how is “centering” handled?
- Repeatability: If you steer to the same target repeatedly, does the tip return reliably or does it drift?
- Durability evidence: What validation was done for the articulation section (cycle testing, cable stretch, wear)?
- Serviceability: If the tip wears, is there a defined maintenance or replacement approach?
Specs that predict real-world results (beyond “resolution”)
The most important specs are the ones that control access (will it fit?), focus (will it be sharp at your distance?), and lighting/glare (will you see detail or just reflections). Resolution matters, but it’s rarely the first limiter in tight cavities.
The practical spec checklist
Use this checklist as a “spec-first” filter—especially if you’re sourcing for OEM integration:
- Probe diameter: Must fit the access port and navigate the path.
- Tip length & bending section: Determines how close you can get and how the tip behaves near obstacles.
- Field of view (FOV): Too wide can distort; too narrow can make navigation hard.
- Depth of field (DOF) / focus range: Determines what distances stay sharp without constant repositioning.
- Working distance (your real inspection distance): Match focus/DOF to your typical viewing distance.
- Lighting design & control: Brightness control matters; glare control matters more than “number of LEDs.”
- Lens window & sealing impact: A protective window can introduce reflections/fogging if not managed well.
- Front vs side view (dual lens): Side view can help when targets are on walls rather than straight ahead.
- Video stability & latency (for steering): If the video is delayed or unstable, steering is harder and slower.
- Environment/cleaning exposure: Defines what “waterproof” must mean (more on this later).
Spec → outcome mini-table (useful vs misleading specs)
| Spec on a listing | What it really affects | Common “gotcha” | What to ask instead |
|---|---|---|---|
| “1080p / 2K / 4K” | Potential detail | Doesn’t guarantee clarity in glare/low light | “At my working distance, what defect size is visible? Any sample images?” |
| “Wide angle lens” | Ease of navigation | Distortion can hide small defects | “What FOV and distortion behavior? Can you show images on reflective surfaces?” |
| “X LEDs” | Illumination availability | More LEDs can still produce glare | “Is brightness adjustable? Any diffusion/angle control?” |
| “Waterproof / IPxx” | Resistance to ingress under defined tests | “Waterproof” is vague without conditions | “Under what depth/time/fluid/cleaning conditions is it rated?” |
| “360° articulation” | Marketing shorthand for steering coverage | May not mean independent 4-way control | “Is it 2-way or 4-way? What are the steering limits?” |
Camera head/module vs complete device: What changes for the buyer
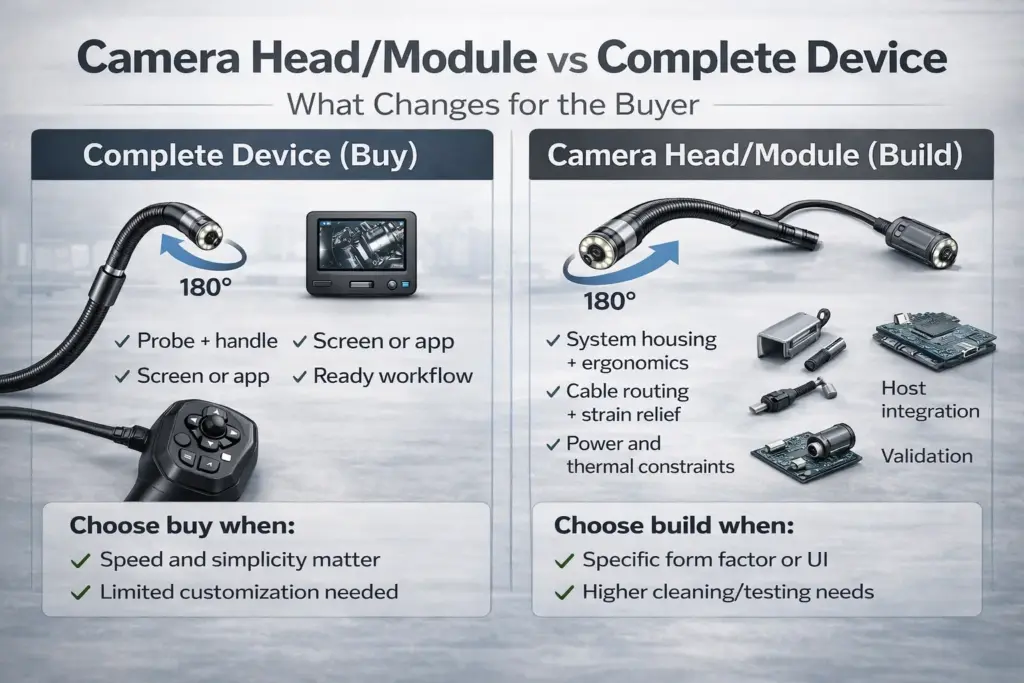
Buying a complete articulating borescope device gives you a ready-to-use tool; sourcing an articulating camera head/module gives you more control over integration, form factor, and system design—but shifts more responsibility to your team.
What a complete device typically includes
- Probe + articulation mechanism + camera head
- Handle with controls for steering and lighting
- Display/recording (screen, storage, app, or PC connection depending on model)
- A defined “ready-to-inspect” user workflow
What a camera head/module approach typically means
You source the imaging head (and sometimes part of the probe assembly), but you may still need to engineer:
- System housing and ergonomics
- Cable routing, strain relief, and connector strategy
- Power management and thermal constraints
- Host platform integration (drivers/firmware/app)
- Validation plan and acceptance criteria
How to choose (build vs buy):
- Choose buy when speed and simplicity matter most, customization is limited, and you’re validating the use case.
- Choose build when you need a specific mechanical envelope, special integration (host platform/UI), or a tailored environment/cleaning profile.
USB vs MIPI for OEM integration (and cable/power pitfalls)
USB is often simpler to integrate at the system level, while MIPI CSI-2 is widely used for embedded camera connections inside devices. The “right” choice depends on your host platform, software stack, cable path, and the stability you need under bending/handling. (MIPI CSI-2 is a widely adopted embedded imaging interface per MIPI Alliance.) (mipi.org)
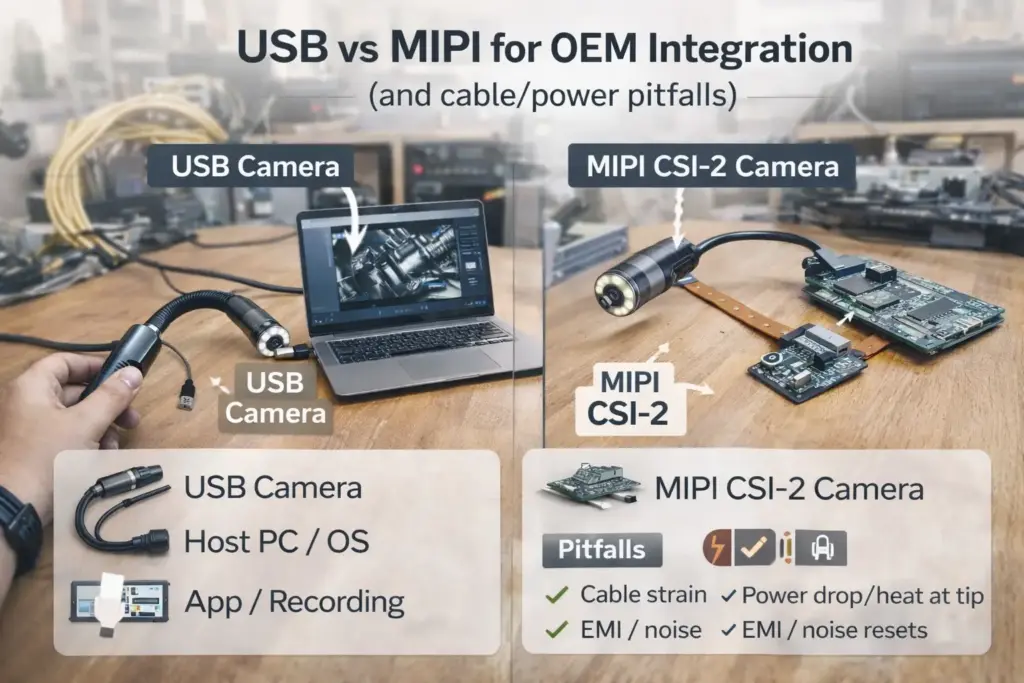
| Factor | USB camera approach | MIPI CSI-2 approach |
|---|---|---|
| Typical integration | Connect to a host with USB support; driver/OS stack often available | Integrate with an SoC’s camera pipeline; platform-specific bring-up |
| Best fit | Prototypes, PC-connected systems, quick validation | Embedded products needing tight integration and optimized pipelines |
| Key constraints | Connector/cable management, power budget at the tip, EMI resilience | Board-level routing, SoC compatibility, software/ISP pipeline work |
| What to confirm early | Host OS/driver support, cable path & strain relief | Host SoC camera support, bring-up effort, cable/routing constraints |
Cable/power pitfalls to plan for (especially in articulated probes):
- Cable strain: repeated bending can stress conductors and connectors—plan strain relief and routing.
- Power at the tip: lighting and camera power need a stable budget; voltage drop and heat can become real constraints.
- Noise/EMI: long or poorly routed cables can create intermittent video or resets; validate under real handling.
If you need to reference official interface documentation in your engineering workflow, USB specifications are managed by USB-IF (see USB-IF’s document library). (usb.org)
Waterproofing, sealing, cleaning, and fogging: What to define and ask
“Waterproof” only means something when you define the conditions (depth/time, fluid type, cleaning method, temperature swings). If a product claims an IP rating, that rating is part of the IEC 60529 ingress protection framework—but the rating still needs test-condition context and may not cover your specific chemicals or cleaning processes. (iec.ch)
Risk checklist: sealing and cleaning questions that prevent surprises
Define your environment first, then ask suppliers to confirm:
- Exposure type: splash, rinse, brief submersion, or extended submersion?
- Fluid types: fresh water, oil, coolant, detergents, solvents, or disinfectants?
- Cleaning method: wiping, rinsing, immersion, high-pressure spray, or chemical soak?
- Temperature swings: will you move from cold storage to warm environments (condensation risk)?
- Lens window behavior: is the window treated/coated? How does it handle glare and droplets?
- Serviceability: if seals degrade, is there a maintenance pathway or replacement approach?
- Evidence: what was actually tested, under what conditions, and what was considered a failure?
Why fogging happens (and how to reduce it)
Fogging is usually a condensation problem: warm, humid air meets a cooler lens window (or vice versa). It can also happen when droplets cling to the window and scatter light.
Practical mitigation ideas (design + usage):
- Reduce temperature shock: avoid moving directly from very cold to very warm/humid environments when possible.
- Control moisture ingress: ensure sealing is consistent and verified for your exposure conditions.
- Improve window behavior: coatings, surface treatments, or design choices can reduce droplet cling (implementation varies).
- Validate with your workflow: test using your real cleaning and temperature conditions, not only “bench tests.”
Illumination & glare: Why lighting dominates in tight cavities
In tight cavities, lighting often determines whether you see surface detail or a washed-out reflection. Even a high-resolution sensor can look “bad” if glare overwhelms contrast or the exposure can’t adapt to shiny/oily surfaces.
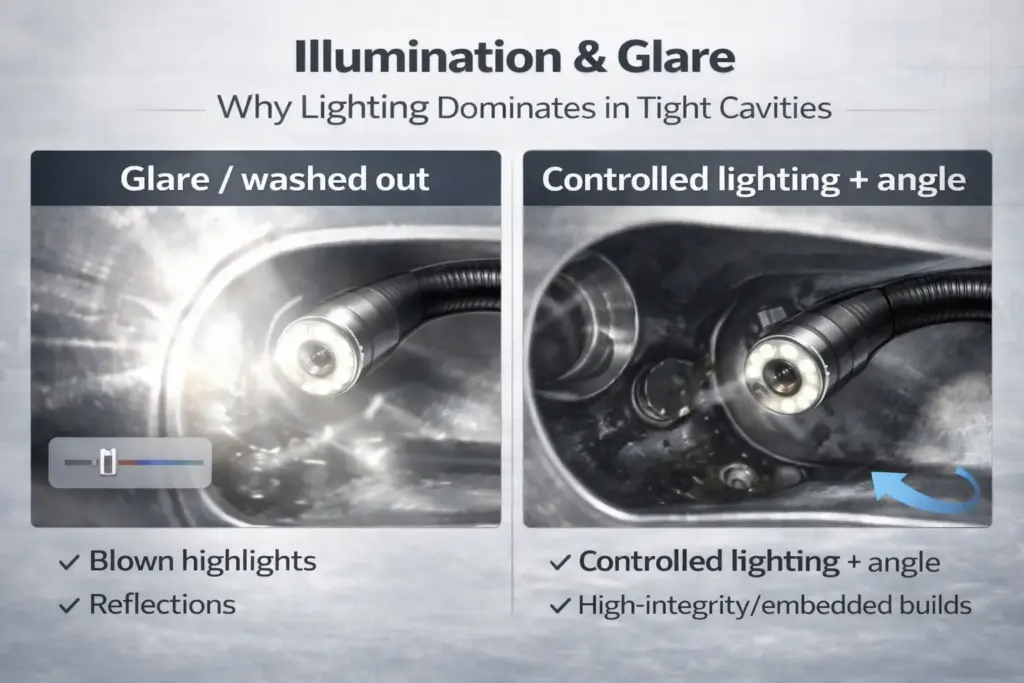
How glare usually shows up (and what to do):
- If highlights blow out: reduce brightness (or enable a lower illumination mode if available).
- If the surface is mirror-like: change angle and distance—articulation helps, but lighting placement matters too.
- If everything looks flat: you may need more controlled illumination (not necessarily “more LEDs”) and better exposure behavior.
Thermal boundary (keep it realistic): a sealed tip with LEDs running continuously can build heat, and heat affects stability and lifetime. The right approach depends on duty cycle, sealing design, and your environment—so treat “continuous runtime” as something to validate, not assume.
Reliability & validation: What to request before volume
Reliability isn’t a single checkbox; it’s a set of validations that should match your real use profile (articulation frequency, cleaning exposure, temperature range, and handling). Before scaling, ask for test evidence that specifically targets the articulation section, sealing, and cable strain.
Validation checklist (organized by risk)
Articulation durability
- What cycling was done on the articulation mechanism (conditions, pass/fail criteria)?
- Was performance checked for drift/play after cycling?
Sealing / ingress
- What exposure conditions were tested (splash vs immersion, duration, fluid type)?
- What was the acceptance criteria (no droplets at the sensor, no functional failure, no fogging)?
Cable strain relief
- What bending/handling tests were done at high-stress points (handle exit, connectors)?
- Was video stability verified during and after handling?
Environmental stress
- Temperature cycling or soak (as relevant to your environment)
- Drop/vibration handling tests (as relevant to your usage)
Reporting and alignment
- Ask for a test summary that includes conditions, criteria, and observations—not just “passed.”
Risk checklist: what often causes late-stage failures
- Undefined “waterproof” requirements (no depth/time/chemicals specified)
- No articulation-cycle validation under realistic bending and handling
- Cable routing that looks fine on a bench but fails in real handling
- Image acceptance criteria not defined (what is “acceptable” blur/glare/noise?)
RFQ checklist for a custom articulating camera solution (module/head)
If you’re requesting a custom articulating inspection camera solution, the fastest way to get accurate feasibility feedback is to provide a complete constraints package: mechanical envelope, viewing needs, environment/cleaning, and integration plan. Lead time, MOQ, and feasibility depend on parts availability and customization depth—so treat early quotes as conditional until requirements are locked.
RFQ step list (send this as your “minimum viable spec”)
- Use case and target geometry
- What are you inspecting (material, reflectivity, expected defect types)?
- Access path: bends/obstacles that drive articulation need.
- Mechanical envelope (the hard constraint)
- Maximum probe diameter, tip length constraints, required reach, and any “no-go” zones.
- Articulation requirement
- 2-way vs 4-way steering preference (or describe the path so the supplier can recommend).
- Any need for “hold position” or repeatable aiming.
- Imaging requirements (define “usable,” not just pixels)
- Typical working distance, field of view preference, and minimum detail you need to see.
- Example images/videos of the target area (if available).
- Lighting and glare constraints
- Reflective/oily/dark surfaces? Any restrictions on brightness or heat?
- Environment and cleaning
- Define exposure conditions (fluids, cleaning method, temperature swings) and fogging concerns.
- Integration plan
- Host platform details; preference for USB vs MIPI (and why).
- Cable path, connector constraints, and handling/bending stress points.
- Validation expectations
- Articulation cycling, sealing exposure conditions, cable strain, and any environmental stress tests you consider mandatory.
- Business constraints (keep this realistic)
- Target volume ranges, ramp expectations, and acceptable iteration cycles for samples.
What to attach to your RFQ (so quotes are comparable)
- Simple drawings or dimensional constraints (even a one-page envelope sketch helps)
- Photos or video of the inspection path and target surfaces
- Host platform summary (SoC/OS, available camera interfaces, integration constraints)
- A short acceptance checklist (image clarity at distance, stability, sealing expectations)
Note
If you’re sourcing an OEM camera head/module: share your mechanical envelope + working distance + cleaning exposure first. That combination usually determines feasibility faster than “resolution” discussions.
FAQ
What is an articulating endoscope (borescope) camera, and when do you actually need articulation?
It’s an inspection camera with a steerable tip that changes viewing direction inside a cavity. You need it when the target isn’t visible along a straight line from the access port—especially around bends, behind obstacles, or when you need repeatable “aim-and-hold” viewing for documentation.
What’s the difference between 2-way and 4-way articulation, and what does “360° articulation” usually mean?
2-way steers in two directions (often up/down); 4-way steers in four directions (up/down/left/right). “360° articulation” is often a shorthand suggesting all-around steering coverage—verify the actual steering directions and limits rather than relying on the label.
What specs matter most when choosing an articulating endoscope camera (beyond “resolution”)?
Start with probe diameter + tip length (fit), then focus behavior (DOF/focus and working distance), then FOV (navigation vs distortion), then lighting control (glare), and finally environment/sealing (cleaning, fluids, fogging). Resolution matters after those constraints are met.
What’s the difference between sourcing an articulating camera module/head and buying a complete borescope device?
A complete device is ready to use (probe + articulation + handle + display/app workflow). A module/head approach gives you more control and customization, but you’ll typically own more integration work: housing, cable routing, power/thermal, host platform software, and validation.
What waterproofing/sealing and cleaning constraints matter—and why do some probes fog up?
Define “waterproof” by conditions: fluid type, exposure duration, cleaning method, and temperature swings. Fogging is usually condensation when temperature/humidity changes cause moisture on the lens window; mitigation is a mix of sealing consistency, window behavior, and validating your real cleaning/temperature workflow.
What reliability tests should you ask for before approving mass production?
Ask for validation evidence tied to your use: articulation cycling (drift/play), sealing/inress exposure conditions, cable strain relief, and relevant environmental stress (temperature, handling). The key is not the test name—it’s the conditions and acceptance criteria.
What information should you prepare for an RFQ for a custom articulating endoscope camera solution?
Provide your mechanical envelope, articulation needs (or inspection path description), working distance and imaging acceptance criteria, lighting/glare constraints, environment/cleaning exposure, host platform/interface preference, cable path constraints, and the validation evidence you’ll require before volume.
Summary: The quick decision path (and what to do next)
If you want a practical way to decide quickly, follow this sequence:
- Fit first: diameter + tip geometry + path constraints
- Steering second: 2-way vs 4-way based on obstacles and aiming needs
- Usable image third: DOF/working distance + lighting control + FOV
- Environment fourth: define sealing/cleaning conditions and fogging risk
- Scale last: request validation evidence aligned to your real use profile
Note
If you already have an envelope sketch and your typical working distance, you’re most of the way to a comparable RFQ. Use the checklist above to reduce back-and-forth with suppliers.