What an Android endoscope camera is (and “borescope vs endoscope”)
An “endoscope camera for Android” usually means a small inspection camera (often called a borescope) that sends live video to your phone for looking inside tight spaces like pipes, engines, or wall cavities. In marketplace listings, “borescope” and “endoscope” are often used interchangeably for non-medical inspection tools.
Key points to keep your expectations realistic:
- Inspection tool vs medical device: “Endoscope” can mean very different things in medical contexts; this guide is about inspection cameras, not medical use.
- Android compatibility isn’t universal: whether it works depends on your phone’s USB behavior, the adapter/cable, the camera’s USB video behavior, and the viewer app.
- Most buyer pain is predictable: “not detected,” “black screen,” and “disconnects” usually map to a small set of root causes you can test quickly.
Android compatibility checklist (OTG + UVC + adapter + app)
A USB endoscope camera typically works on Android when (1) the phone can act as a USB host (OTG/host mode), (2) the connection path carries data (not charge-only), and (3) the camera’s video stream is supported by your app/Android build—often marketed as “UVC.” Android’s USB host documentation explains that in host mode the device powers the bus and enumerates connected USB devices.

Compatibility checklist (60-second version)
- OTG/Host mode available: your phone can act as USB host (some phones/tablets disable or limit it).
- Data-capable adapter/cable: USB-C or micro-USB adapter supports data (not “charging only”).
- Camera video behavior is supported: many inspection cameras present as a standard USB video device (often described as UVC); UVC is defined in USB-IF’s Video Class document set.
- A compatible viewer app: the app can open the device and display its stream; app support can vary by device and stream format.
- Boundary reality check: Android is fragmented—if it works on one phone and not another, that can still be normal.
Mini-table: “If this fails, what should you do?”
| Gate | Quick check | If it fails | Where to fix |
|---|---|---|---|
| OTG/Host | Search your phone specs for “USB OTG” or test with a known USB device | Phone can’t enumerate USB devices | Troubleshooting section (“Not detected”) |
| Adapter/cable | Try a known-good data OTG adapter/cable | No data path (charge-only) | Adapter section (decision tree + quick tests) |
| App/stream | Try a second reputable viewer app | App/format mismatch | Troubleshooting (“Black screen/no video”) |
| Stability | Wiggle test + short session | Power/interference issues | Troubleshooting (“Disconnects/choppy” |
USB vs WiFi endoscope for Android: Which should you choose?
If you prioritize low latency and fewer moving parts, USB is usually the safer bet; if you need distance or electrical isolation, WiFi can be more convenient. The trade-off is that WiFi adds a network layer that can be sensitive to interference and phone behavior.
Comparison table (buyer-friendly, not spec-dump)
| Factor | USB endoscope (wired) | WiFi endoscope (wireless to phone) |
|---|---|---|
| Latency | Typically lower | Often higher / more variable |
| Stability | Depends on phone power + adapter quality | Depends on interference + camera hotspot quality |
| Setup steps | OTG/adapter + app + USB permission flow | Join camera WiFi + open app (sometimes no internet while connected) |
| Power | Often draws power from phone | Usually has its own battery or power source |
| Best for | Fast inspection close to the phone | Longer reach, awkward access, or when the phone port is unreliable |
| Common failure | “Not detected” (OTG/adapter/power) | “Connected but no video” (app/network), drops in noisy RF environments |
Choose USB if…
- You want the simplest workflow once the adapter is correct.
- You need the lowest lag while steering the probe.
- You can keep the phone close and your phone’s OTG/power behavior is solid.
Choose WiFi if…
- You need extra distance from the inspection point.
- Your phone’s USB port/OTG behavior is unreliable across devices.
- You prefer the camera to have its own power source (less phone battery drain).
Boundary notes:
- WiFi reliability can change a lot in metal-rich environments or crowded RF areas.
- USB reliability can change with phone model, low-battery modes, and adapter/hub quality.
Connectors & OTG adapters: USB-C vs micro-USB (and why “charge-only” fails)
Most “it doesn’t work” cases are not the camera—they’re the connection path. If your adapter/cable only supports charging (or is poorly built), Android may never see the device, even if OTG is enabled.

Decision tree: which adapter/cable you need
- If your phone has USB-C:
- Use a USB-C OTG data adapter (USB-C → USB-A female) if your endoscope has a USB-A plug.
- Or use a USB-C to USB-C data cable only if the endoscope is truly USB-C and supports data.
- If your phone has micro-USB:
- Use a micro-USB OTG adapter (micro-USB → USB-A female).
- If the camera is a “3-in-1” cable bundle:
- Still verify the branch you use supports data, not just power.
Practical rule of thumb:
- If the adapter/cable feels like a generic charging accessory with no mention of OTG/data, treat it as suspicious until proven otherwise.
Quick tests to rule out “charge-only” and power issues
Try these in order (fastest signal first):
- Remove variables: connect the endoscope directly—no hubs, no extension cables.
- Swap the adapter/cable: test with a known-good OTG data adapter (borrow one if possible).
- Test on a second Android device: if it works there, your first phone’s OTG/power/app path is the issue.
- Watch for any connection prompt: some phones show a USB permission prompt when a device is detected (behavior varies by Android build).
- Stability check: if it connects then drops, suspect power draw or a loose port fit (cases can prevent full seating).
Boundary notes:
- USB hubs vary widely; some help with power, some add new problems. Start direct, then add complexity only if needed.
- Phone power output and USB behavior can change with battery level and vendor firmware.
Once the adapter path is correct, you can usually get to first video quickly with a short, repeatable setup flow.
Setup steps: How to connect and get video on Android (USB + WiFi)
The fastest path to success is: verify OTG → connect with a data-capable adapter/cable → use a compatible viewer app → handle the permission flow → confirm live preview. Android’s USB host documentation describes the host-mode device enumeration model that underpins why OTG is the first gate.
USB endoscope setup (OTG): steps to first video
- Confirm OTG/host capability on your phone (spec sheet, settings hint, or a quick OTG test with another USB device).
- Close other camera apps (some phones/apps behave better when nothing else is using camera-related resources).
- Connect the endoscope using a data-capable OTG adapter/cable.
- Open your viewer app (prefer reputable sources; see the apps section).
- Accept the USB permission prompt if it appears (some apps also have an “Always allow” checkbox).
- Look for live preview. If you see controls but no image, skip to the “black screen” troubleshooting path.
- Capture photo/video inside the app (capture features vary by app).
Boundary notes:
- Some app/device combinations don’t support every stream format; testing a second reputable app is a valid diagnostic step.
- Some Android devices handle external USB cameras differently depending on vendor firmware and Android build.
WiFi endoscope setup: when and how it differs
- Power on the WiFi endoscope and wait for it to broadcast its WiFi network (SSID).
- Join the endoscope WiFi network in Android WiFi settings (your phone may warn “no internet”).
- Open the vendor app (or the app recommended by the device maker).
- Grant only the permissions needed for basic video display (see privacy section).
- Confirm live preview, then test stability in the real environment (metal enclosures and crowded RF can change results).
Boundary notes:
- Some WiFi cameras keep video inside the local connection only; internet access may pause while connected.
- Stability depends heavily on environment and phone WiFi behavior.
Troubleshooting triage: Not detected vs black screen vs disconnects/choppy
Most failures fall into three buckets: (1) not detected, (2) detected but no video, (3) unstable video. The Android platform documentation also describes external USB camera support at the system level for plug-and-play USB cameras (webcams), which highlights why implementation differences can matter across devices.
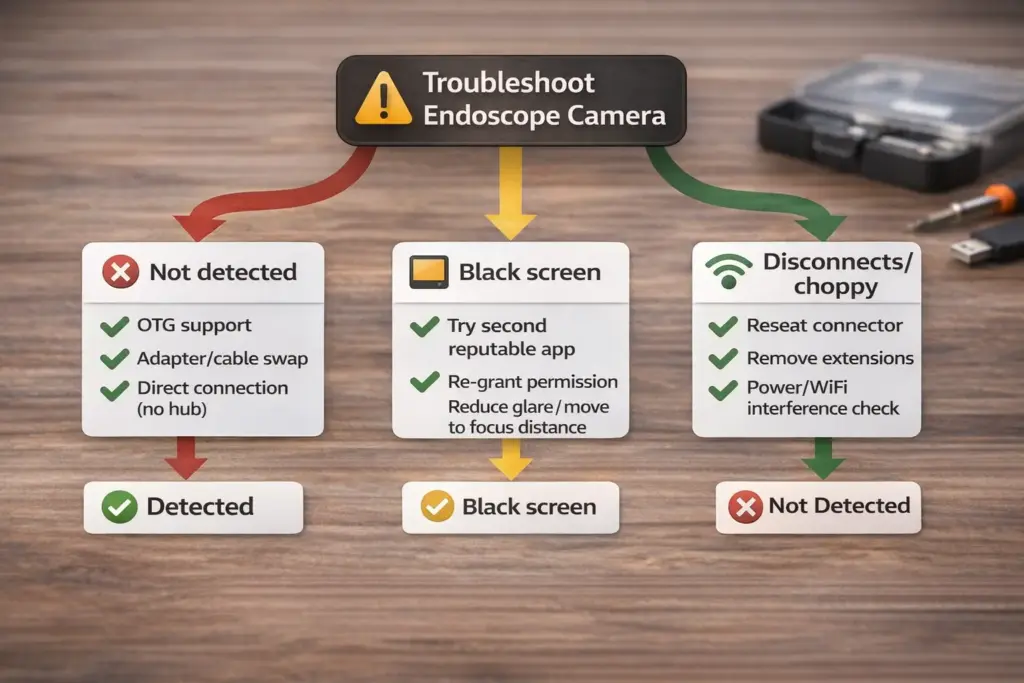
Quick triage table (start here)
| Symptom | Most likely bucket | Fastest checks |
|---|---|---|
| Nothing happens when you plug in | Not detected | OTG support → adapter/cable swap → direct connection (no hub) |
| App shows device connected but video is black | Black screen / no video | try second reputable app → re-grant permission → reduce LED glare / move to correct focus distance |
| Video freezes or disconnects | Unstable | reseat connector → remove extensions → power/battery check → WiFi interference check (if WiFi model) |
Boundary notes:
- “Works on Phone A, fails on Phone B” can happen because Android devices differ in USB and camera stack behavior.
- Treat “UVC compatible” as a helpful signal, not a guarantee.
Not detected at all: fastest checks first
Do these in order:
- Confirm OTG/host mode is supported on your phone. Without it, a USB endoscope won’t enumerate.
- Swap the adapter/cable (assume “charge-only” until proven data-capable).
- Remove hubs and extensions (connect directly).
- Try a second phone/tablet to separate “camera problem” from “phone path problem.”
- Check physical seating: cases and worn ports can prevent full contact.
- Power suspicion: if it connects briefly then drops, battery/power limits may be involved.
Detected but black screen/no video: app or stream mismatch
If Android detects the device but you get no picture:
- Try a second reputable viewer app (some apps don’t support specific stream formats or devices).
- Re-plug and re-accept permission (permission prompts can be inconsistent across devices/apps).
- Reduce variables: turn down LED brightness, move to the expected working distance, and avoid reflective surfaces (glare can look like “no detail”).
- If your device is WiFi-based: confirm you’re on the endoscope network and the app is pointing to the correct source.
Disconnects/choppy video: power, cable handling, and WiFi interference
For unstable sessions:
- USB models: reseat the connector, remove extension cables, and avoid bending/straining the cable right at the plug.
- Phone power behavior: test with a fuller battery, and avoid extreme low-power modes during use.
- WiFi models: test closer to the camera, away from metal enclosures and crowded routers, and re-test in the actual work environment.
Once reliability is under control, choosing the right specs for your job will do more for results than chasing marketing resolution claims.
Specs that matter for real inspections (diameter, cable, optics, lighting)
After compatibility, the most important success driver is fit for your inspection scenario: can the probe physically reach, and can it produce a usable image at the working distance with the available lighting? Specs are only helpful when tied to how you’ll use the tool.
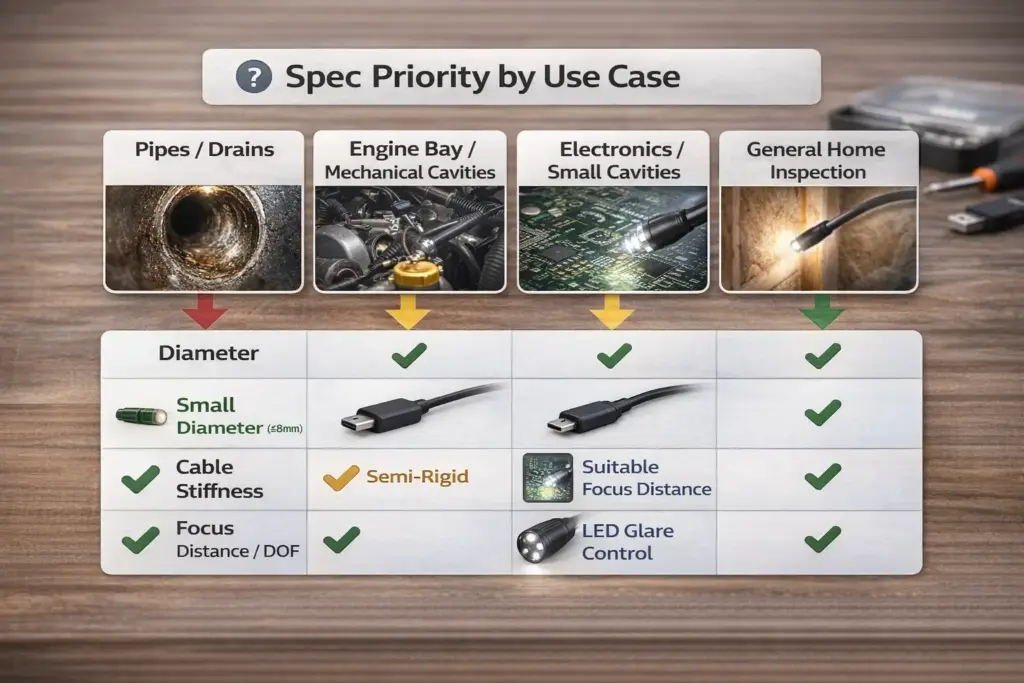
Scenario → spec priority mini-table
| Your job | What to prioritize first | Why it matters |
|---|---|---|
| Pipes / drains | Smaller diameter + adequate reach | Physical access is the main constraint |
| Engine bay / mechanical cavities | Semi-rigid cable + steering control | You need to direct the tip reliably |
| Electronics / small cavities | Suitable focus distance + glare control | Close-up clarity is often limited by focus and reflections |
| General home inspection | Balance of reach + lighting + ease of handling | You want predictable results with fewer surprises |
Mechanical fit: diameter, cable length, and stiffness
Start with what can make the tool unusable on day one:
- Probe diameter: determines where it can physically go.
- Cable length: determines reach, but longer cables can be harder to steer and easier to snag.
- Cable stiffness: semi-rigid cables are often easier to guide; very flexible cables can be harder to control in cavities.
Boundary notes:
- “Longer” isn’t always “better”—handling and steerability can degrade with length.
- If you need a very thin probe, you may trade off robustness and lighting options (varies by product).
Usable image: focal distance/DOF, FOV, and LED glare control
Resolution headlines don’t guarantee a usable image. What usually matters more in tight inspections:
- Working distance vs focus: if the camera’s effective focus range doesn’t match your working distance, the image can look soft even at “HD.”
- Field of view (FOV) vs distortion: very wide FOV can help awareness but may distort edges and reduce perceived detail.
- LED glare: reflective surfaces (metal, wet pipes) can wash out details; brightness control helps more than “more LEDs.”
Boundary notes:
- Image quality depends on surface reflectivity and lighting conditions; test in your real environment.
- Don’t assume a listing’s “HD/1080p” claim will match your usability needs at close range.
Once you’ve chosen hardware that fits, the app becomes the last major variable—especially for reliability and privacy.
Apps & Privacy: What to install, what to avoid, permission red flags
You’ll often need a viewer app for USB endoscopes, but you should treat apps as part of the system—and limit permissions to what’s necessary. Android’s permissions overview is a good baseline for understanding why apps should only request access they truly need.
App selection checklist (reliability + trust)
Use these heuristics instead of chasing a single “best” app (compatibility varies):
- Prefer apps from reputable sources (official stores or well-known publishers).
- Check for recent updates and a clear privacy policy.
- Favor apps that can run with minimal permissions for basic live view.
- Treat reviews as signals, not proof: look for patterns like “works on my device” vs “never detects.”
Permission red flags (risk checklist)
A basic viewer app typically needs only a small set of access:
- Reasonable for basic viewing:
- Camera/video access (where applicable)
- USB device access/permission flow (app-managed)
- Treat as suspicious unless clearly justified:
- Contacts, SMS, call logs
- Precise location
- Accessibility service (high-power permission)
- Broad file/media access for “simple live view” (ask: why does it need this?)
Safer usage habits:
- Deny any permission that isn’t required for your use case.
- Avoid installing random APKs from unknown sites just to “make it work.”
- If it’s a WiFi endoscope, consider using it on a controlled network and don’t grant extra permissions without a clear feature need.
OEM view: How to spec an Android-compatible endoscope/inspection camera product
An Android-compatible inspection camera product succeeds when you spec the module + firmware/video behavior + app workflow together and validate across a representative device set—because Android fragmentation turns “works in the lab” into support tickets in the field. The Android platform documentation notes plug-and-play external USB camera support via standard APIs/HAL, which is useful context for designing for system compatibility.
Requirements checklist: module, firmware, formats, power, and cable assumptions
Use this as a starting point for a PRD/RFQ:
- Target device list: which phones/tablets and Android versions you promise to support (scope beats “all phones”).
- Connection architecture: USB (OTG) vs WiFi—choose early because it drives hardware and UX.
- USB video behavior: define the expected class/behavior (commonly “UVC”) and supported formats in a way your app can handle. For UVC definition grounding, use USB-IF’s Video Class v1.5 document set.
- Power budget: worst-case draw, low-battery behavior, and whether you include a powered hub/adapter bundle.
- Mechanical/optical constraints: diameter, cable type/length, focus range, LED glare control.
- App UX requirements: permission flow, “first video in under X steps,” and clear in-app troubleshooting messages.
Validation matrix: how to test across phones and reduce support tickets
A practical validation plan looks like:
- Test across a matrix of major OEMs + Android versions relevant to your customers.
- Include “real-world” cases: different adapters, partial insertion, low-battery mode, and background app interruptions.
- Track failures by bucket (not detected / black screen / unstable) and ensure you can reproduce and fix the top patterns.
- Document a supported device scope and a short triage guide users can follow.
If you’re building an Android inspection camera product (or need a USB/UVC camera module for a similar workflow), Supertek’s core work is custom camera module development and manufacturing (hardware + firmware/software customization, sampling → production). If you share your target phone list, cable length, working distance, and preferred connection type (USB vs WiFi), a supplier can usually help you narrow module options and define a validation plan without guessing.
Before wrapping up, it’s worth setting realistic expectations about “waterproof” claims—because misuse is a common cause of early failure.
Waterproofing & maintenance: What “waterproof” usually covers (and what it doesn’t)
“Waterproof” often applies to the probe head and a portion of the cable, not necessarily the connectors or electronics inside the handle. Treat it as scope-limited unless the manufacturer documentation clearly states otherwise.
Practical maintenance tips:
- Keep connectors dry and avoid submerging parts not explicitly rated for it.
- After wet use, wipe and dry the probe before storage to reduce corrosion and fogging risk.
- Avoid sharp bends and repeated stress near the connector strain relief (common failure point).
- Clean the lens gently; scratches and residue can permanently reduce usable clarity.
Boundary notes:
- Exact protection varies by product design; verify the maker’s documentation rather than assuming an IP rating.
- This is general care guidance, not a compliance statement.
If you want quick answers to the most common “will it work” questions, the FAQ below summarizes the key points.
FAQ
- Q: What is the difference between a borescope and an endoscope camera?
A: In consumer listings, “borescope” and “endoscope camera” often describe the same inspection-camera tools for looking inside tight spaces. In medical contexts, “endoscope” can imply very different requirements, so don’t assume medical suitability from marketplace wording. - Q: How do I connect my endoscope camera to my phone?
A: For USB models, confirm OTG/host mode, use a data-capable OTG adapter, open a compatible viewer app, and accept the USB permission prompt if it appears. If you get no video, try a second reputable viewer app and re-check the adapter/cable. - Q: Can I connect an external camera to an Android phone?
A: Sometimes, yes—Android can act as a USB host and enumerate external USB devices when OTG/host mode is supported, but behavior can vary by device and Android build. Use an OTG data adapter and a compatible app, and expect some phone-to-phone variability. - Q: How do I know if my Android phone supports OTG/USB host mode?
A: Check the phone’s official specs for “USB OTG,” or test with a known USB device through an OTG adapter. If your phone can’t enumerate USB devices in host mode, a USB endoscope won’t be detected. - Q: Why is my endoscope camera not detected (or shows a black screen) on Android?
A: “Not detected” is usually OTG/adapter/power; “black screen” is often app/stream support or permission flow. Start by swapping the OTG adapter/cable, removing hubs, and testing on a second phone, then try a different reputable viewer app. - Q: Do I need a special app for a USB endoscope camera on Android?
A: Often you do, because the app needs to open the USB device and display its stream—and support varies by phone and stream behavior. Choose reputable apps, keep permissions minimal, and treat broad permissions as a red flag unless a feature clearly requires them.
If you remember only one thing: compatibility is a checklist problem, not a guessing game—OTG/host mode, data adapter, app support, and realistic expectations solve most cases.
Summary
Key takeaways (compatibility-first):
- If the phone can act as USB host (OTG) and your adapter/cable carries data, Android can enumerate the device; that’s the first gate.
- “UVC” is a real USB video class definition (USB-IF), but it’s not a universal guarantee of Android app compatibility.
- Choose USB vs WiFi based on workflow: USB tends toward lower latency; WiFi tends toward more flexible distance but higher variability.
- Troubleshooting is fastest when you bucket symptoms: not detected vs black screen vs unstable.
- Don’t let the app become the weak link: use reputable sources and minimize permissions.
If your use case is product development (not just a one-off purchase), the fastest way to reduce field failures is to define a supported device scope and validate early. For camera-module/OEM needs, sharing your constraints (target Android devices, cable length, working distance, lighting environment, USB vs WiFi) makes supplier discussions far more concrete.